Documents
Our Documents feature leverages AI models to scan business documents and retrieve vendor information for data entry/integrity.
At this stage, this feature is considered Experimental, please validate the data generated by AI.
See the following quick demo for an overview:
The uploaded file is not saved during transport.
Usage
Once fully configured, the Documents feature will be available in:
- Payee check
- Onboarding wizard
- Parameters > AI tab
We offer 2 different approaches for Documents, depending on access level, which produces similar results.
- Document Intelligence uses Azure Document intelligence
- AI Builder uses Microsoft AI Builder and Power Automate
Data
Depending on the configurd minimum confidence requirements, the scan data will provide the following information from the scanned document:
| Data | Onboarding | Payee check |
|---|---|---|
| GovCode | ||
| Name | ||
| Address | ||
| Recipient | ||
| SWIFT | ||
| IBAN | ||
| BankAccountNumber | ||
| Currency |
Upload document
Upon triggering AI Builder, the following popup will prompt the user to upload a document for scanning:

Performance
The chosen azure location impact on the performance of this tool. On average, We noticed on average about 4-10 seconds for Document intelligence and about 15-25 seconds for AI Builder.
Larger files will take longer to upload and scan, regardless of scanning only the first page.
Document Intelligence
Intro
Document intelligence leverages Azure AI Document intelligence (formerly Form Recognizer), a cloud-based Azure AI service that uses advanced machine learning and OCR to automatically extract text, tables, structures, and key-value pairs from PDFs, images, and forms. It transforms unstructured data into actionable, structured data, enabling automated workflows and intelligent document processing. This feature uses the prebuilt-invoice model.
For more information, see:
See AI Document Intelligence terms of services for latest updates on costs, terms and conditions.
Deployment
This option requires an AI Business Intelligence resource, configured in Eftsure > Parameters > AI > Documents To enable the Document Intelligence feature, your eftsure administrator needs to perform the following steps in your tenant: The following steps should take less than 10 minutes.
The Business Intelligence below has related costs that depends on consumption. See Pricing for more details.
At the time of writing, Microsoft offers the following Pay as You Go options:
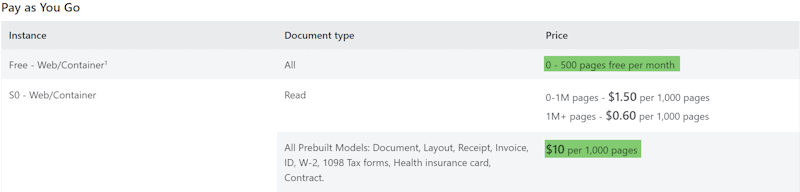 We expect the Free tier with 500 invoices per month should be enough for most customers, as this is the number of payee checks, not related the number of invoices received/processed by the customer.
Azure Portal
Follow the steps in Create a Document Intelligence resource
Note the Url and Keys for the next step.
Eftsure inside Dynamics 365 FO
Go to Eftsure Parameters > AI > Documents, Configure Type to Document Intelligence and configure the previous endpoint and keys into Document Intelligence
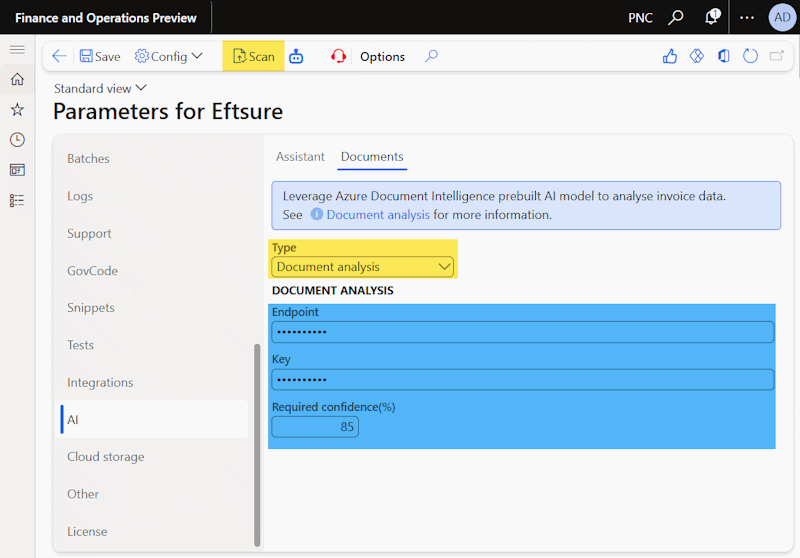
Configure the minimum confidence rate to validate outputs.
Save and use the Test document in the toolbar to test the newly deployed flow.
AI Builder
Intro
AI Builder leverages Microsoft AI Builder and Power Automate, with it's prebuilt Invoice processing template.
For more information, see:
To design your own custom template, see custom overview
See AI Builder Licensing and terms of services for latest updates on costs, terms and conditions.
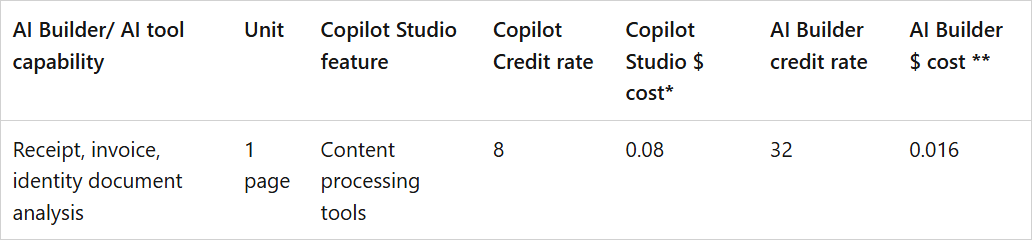
AI Builder features in Power Automate can consume both AI Builder credits, or Copilot Credits if there are no available AI Builder credits.
At the time of writing, Microsoft offers the following Pricing options:
Deployment
This option requires an AI Business Intelligence resource, configured in Eftsure > Parameters > AI > Documents To enable the AI Builder feature, your eftsure administrator needs to perform the following steps in your tenant: The following steps should take less than 10 minutes.
The Power Automate - Flow below has related costs that depends on consumption. Some steps require Premium access.
Power Automate - Flow
- Sign in to Power Automate.
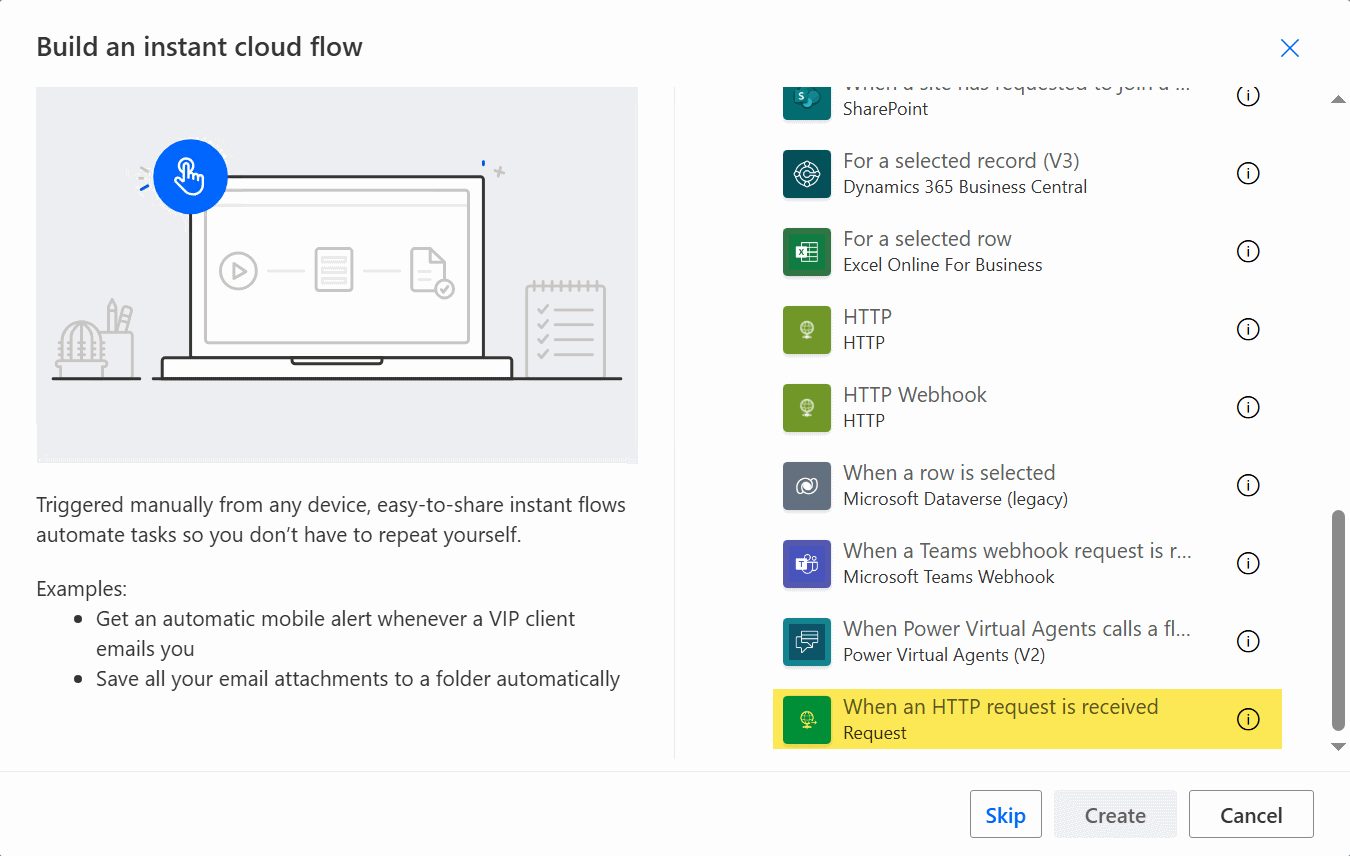
- Select My flows in the left pane, and then select New flow > Instant cloud flow.
- Name your new cloud flow
- Select When a HTTP request is received under Choose how to trigger this flow, and then select Create.
- A New flow is created with the appropriate trigger. The new webservice url will only be displayed after save. Hit Show All to set the method to POST
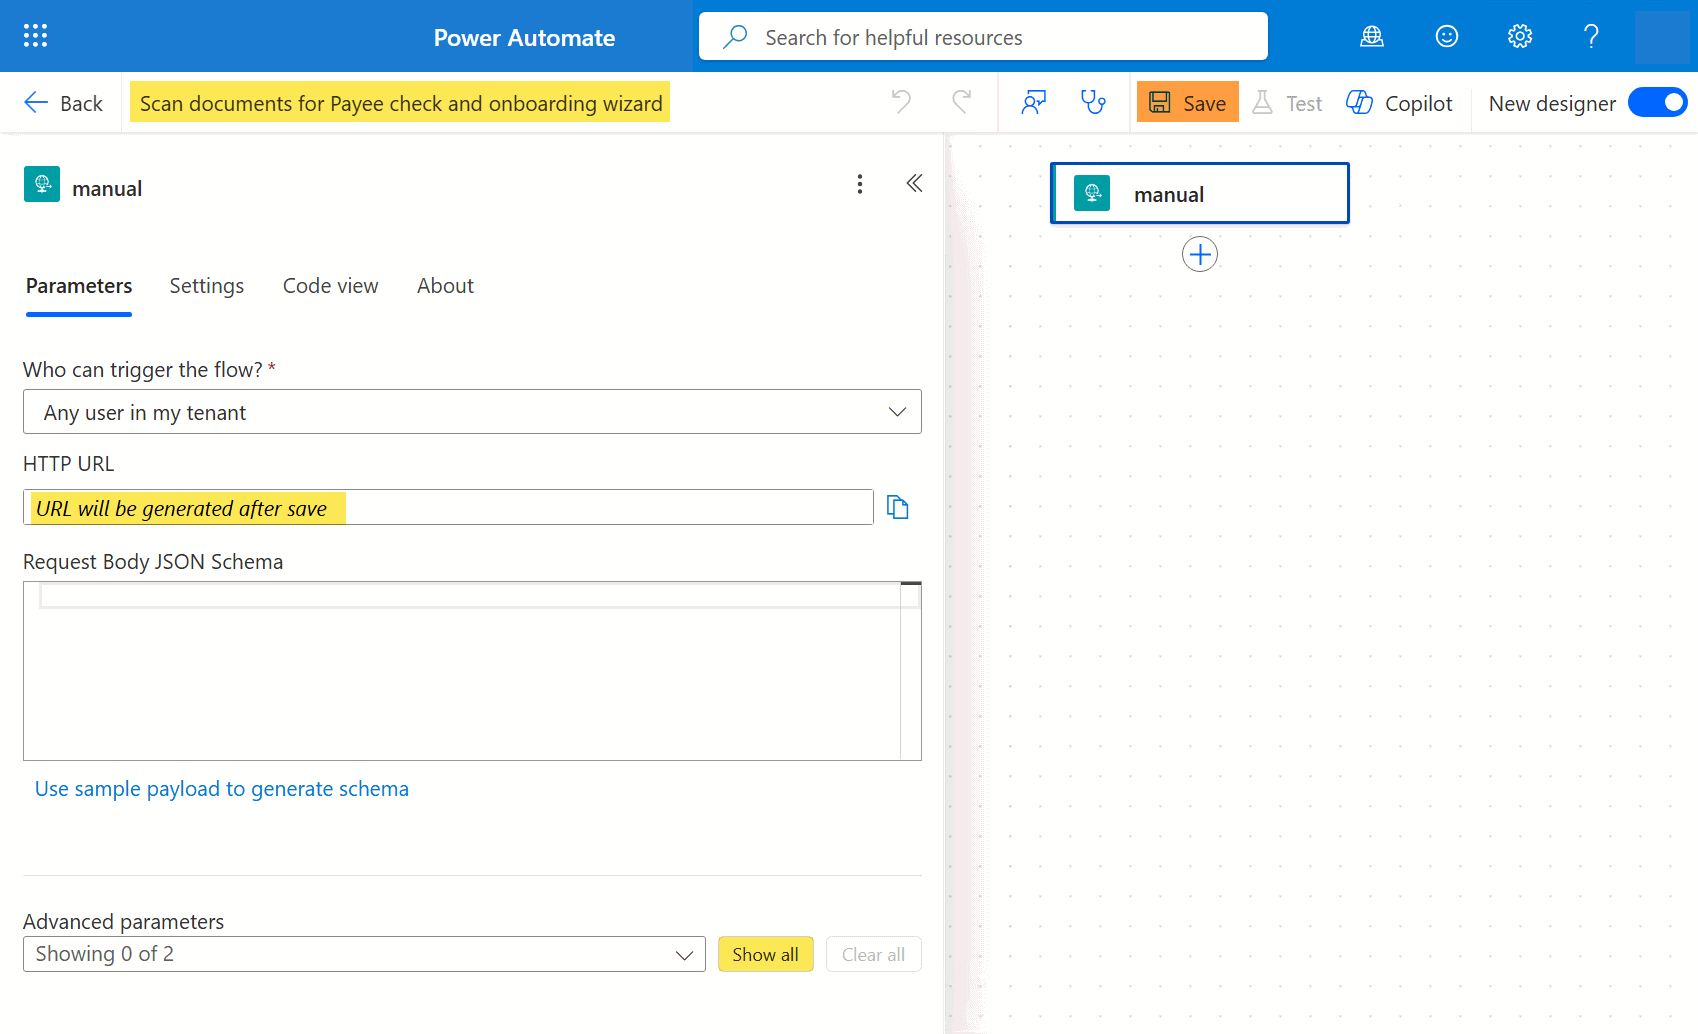
The Webservice url will only be populated after saving the flow.
- Set Who can trigger the flow? to Everyone
- Enter the following Request Body JSON Schema:
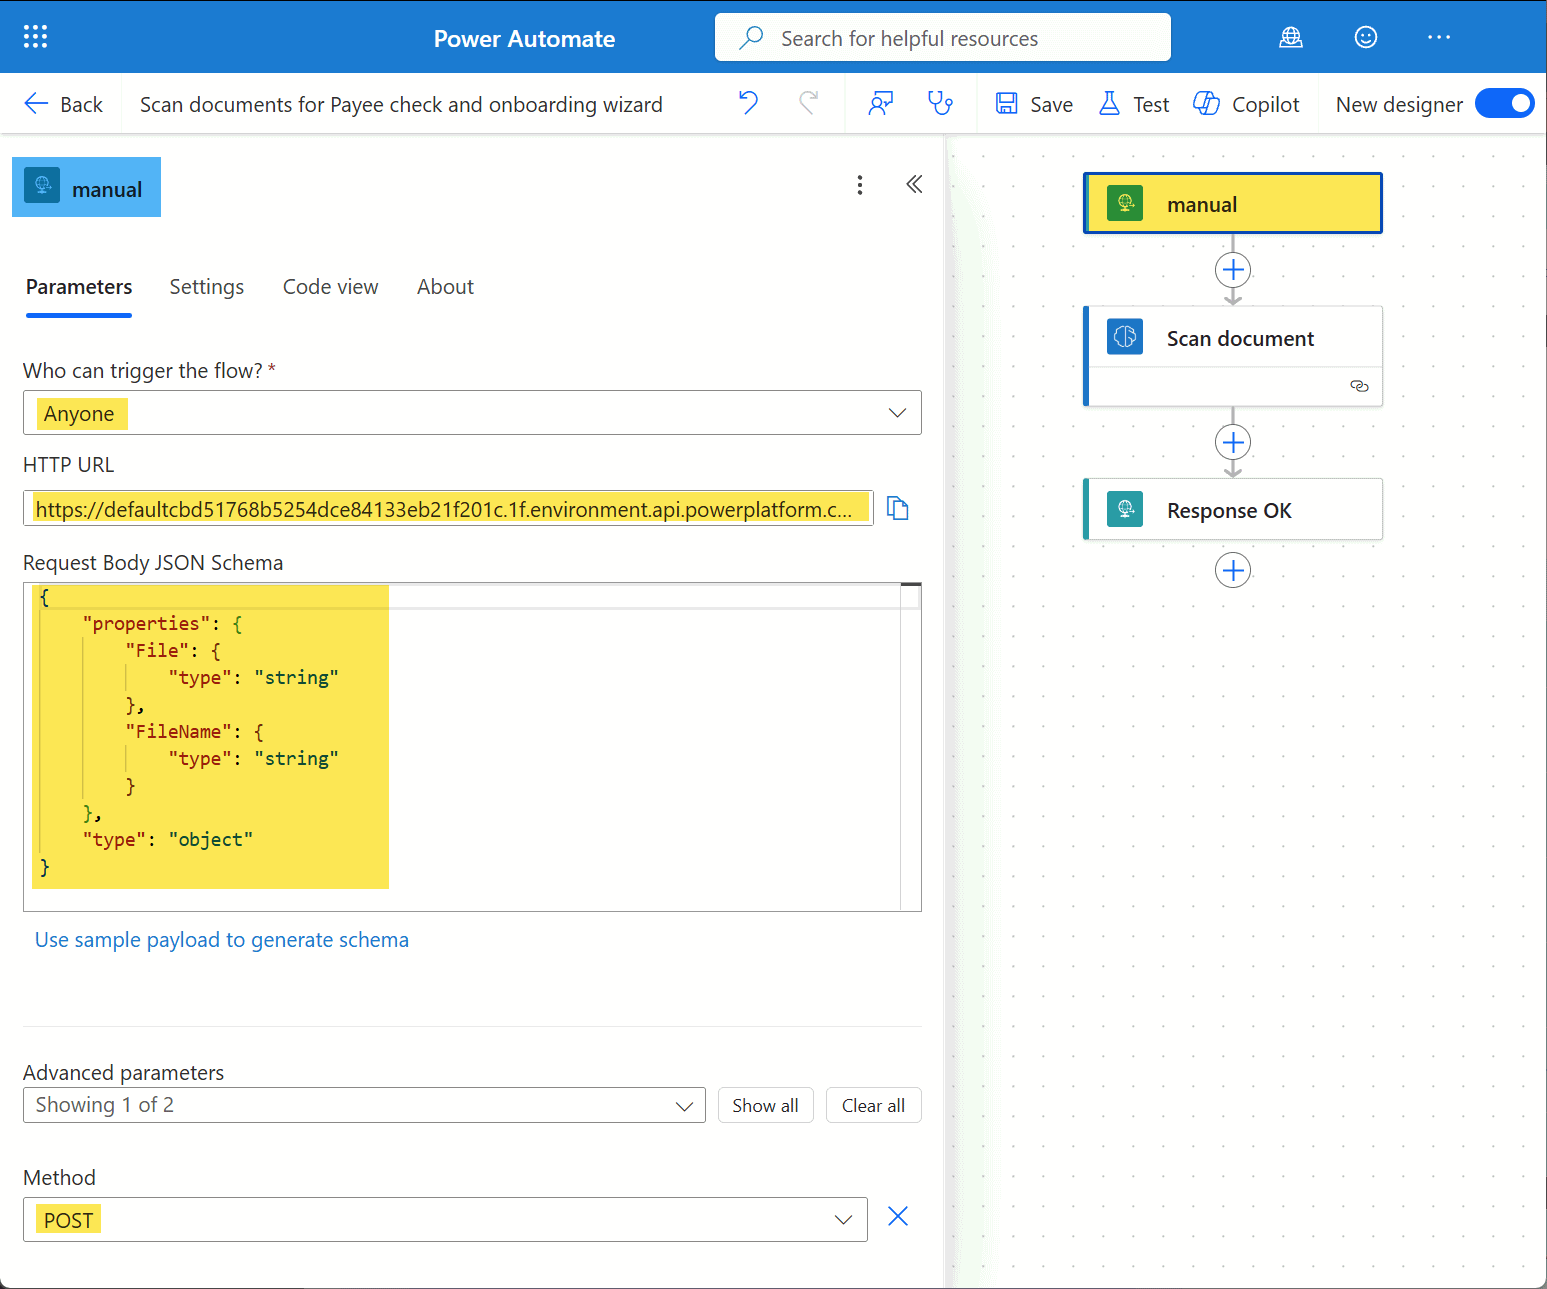
{
    "properties":
    {
        "File": { "type": "string"},
        "FileName": {"type": "string"}
    },
    "type": "object"
}
This will allow the following payload to be passed from Dynamics 365:
{
    "File": "BASE64 encoded file",
    "FileName": "Filename.ext",
}
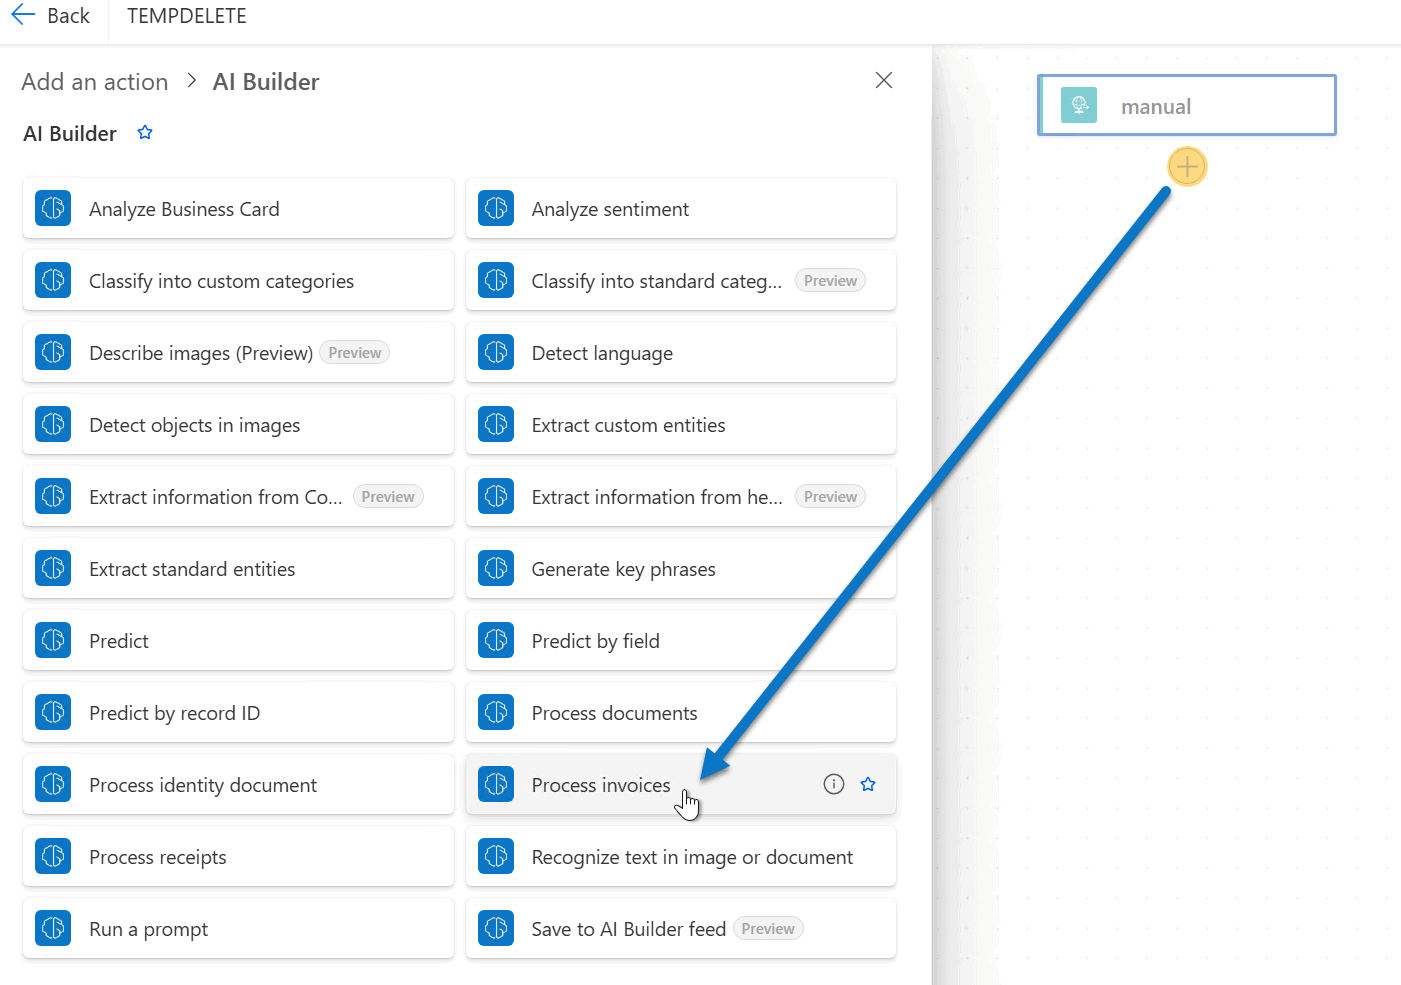
- Add a new AI Builder > Process invoices step to the flow:
- Set Pages to 1
- Set Invoice file
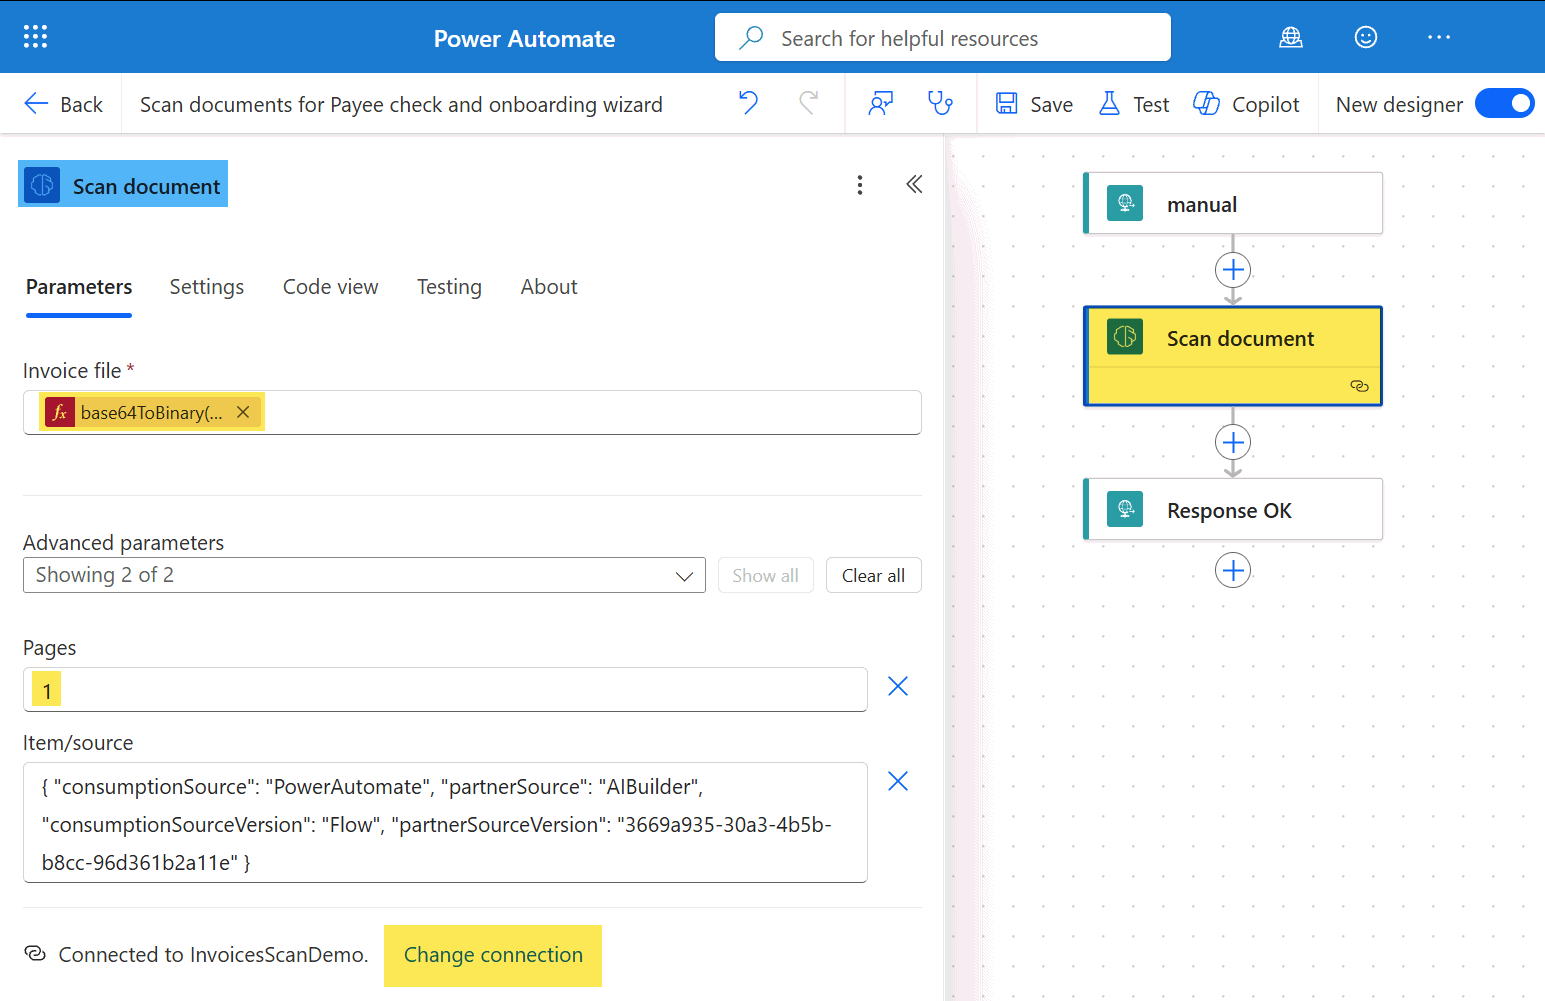
base64ToBinary(triggerBody()?['File'])
- Add new Request > Response:
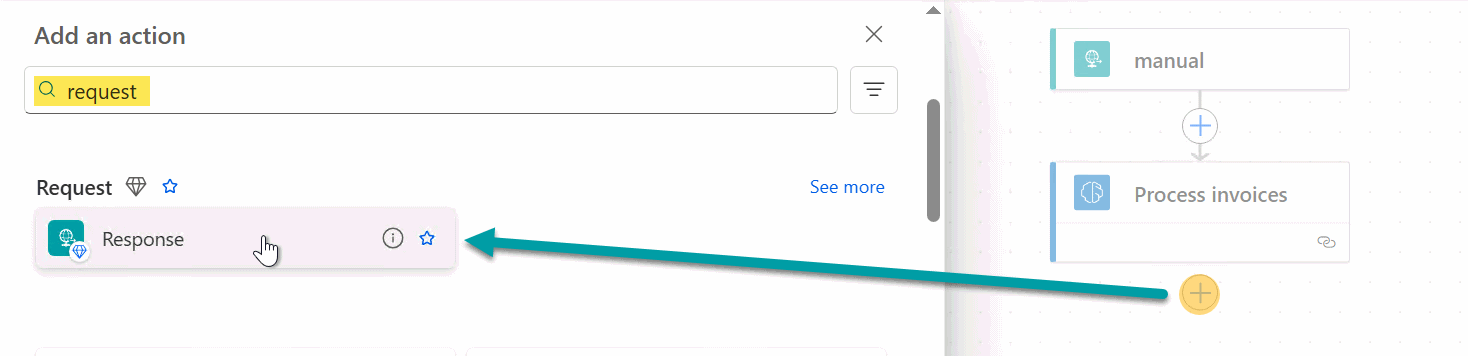
- Set the following parameters on the new response:
outputs('Scan_document')?['statusCode']
outputs('Scan_document')?['body']
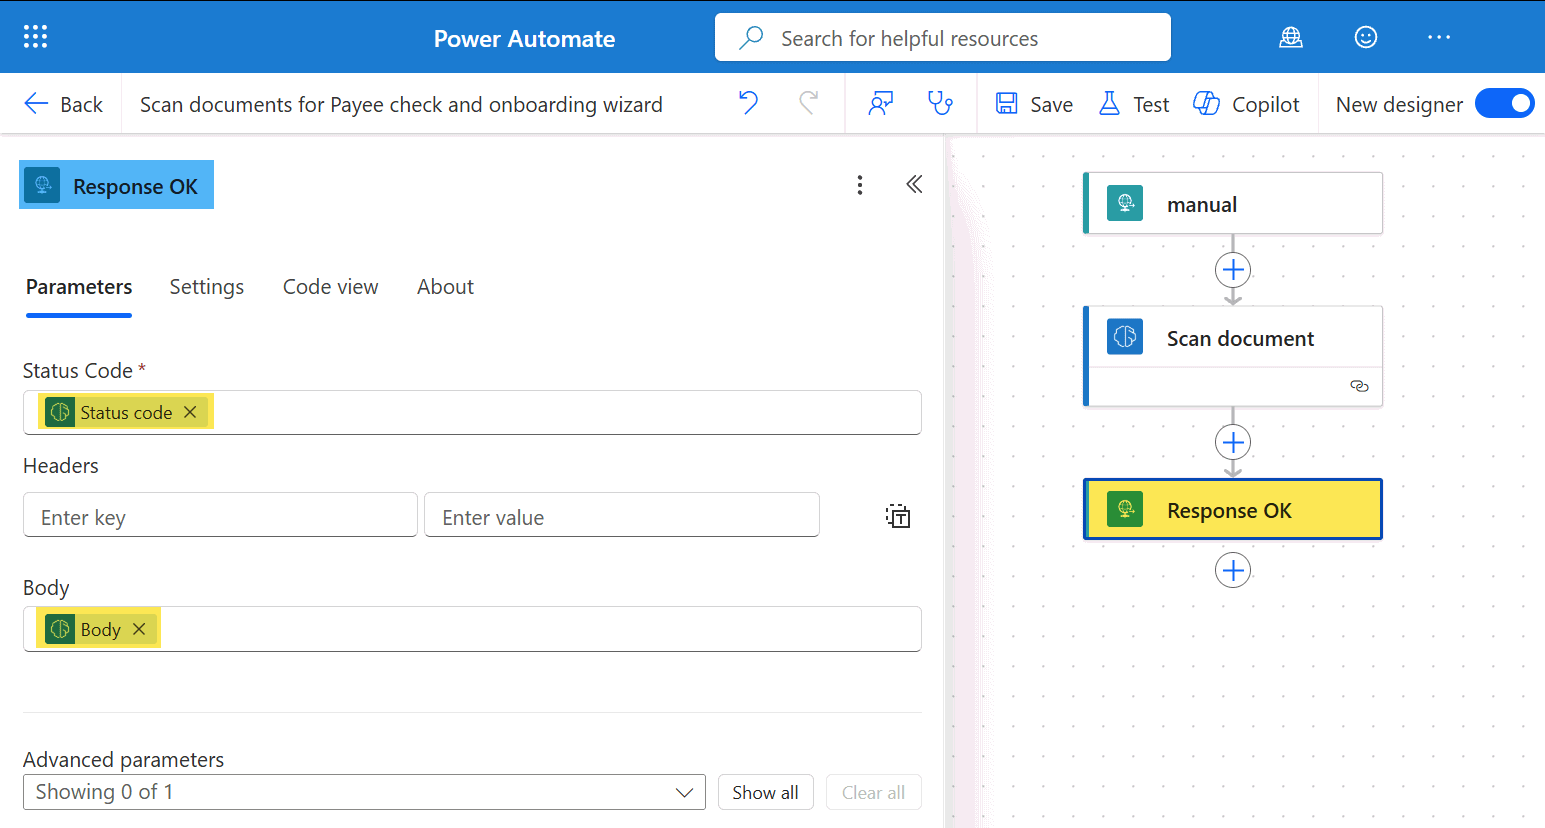
- Save the flow, which will create manual step webservice url
- Go back to the manual step (first), Copy the Url from Step1 to configure into Eftsure inside Dynamics 365
Eftsure inside Dynamics 365 FO
Go to Eftsure Parameters > AI > Documents, Configure Type to AI Builder and configure the previous webservice url into AI Builder > Webservice URL
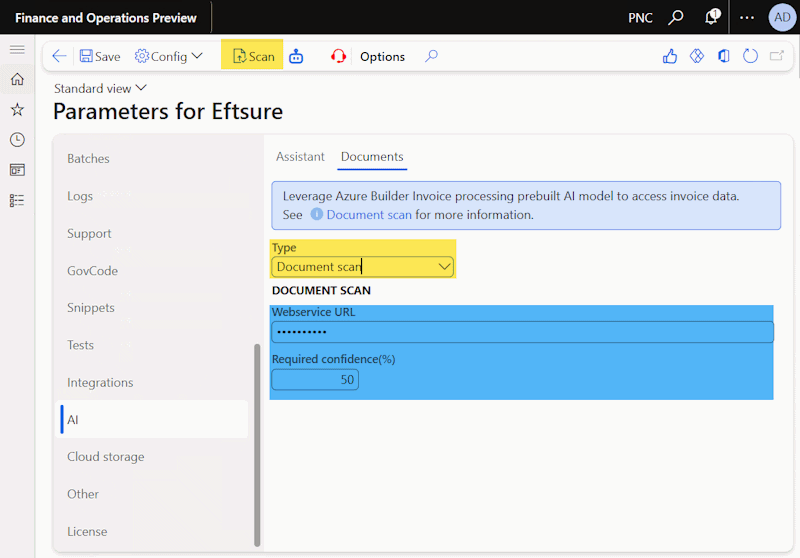
Configure the minimum confidence rate to validate outputs.
Save and use the Test document in the toolbar to test the newly deployed flow.
Usage
During our testing, we observed the following:
| Item | Description |
|---|---|
| Performance | Document intelligence is much faster (4x) as is direct connection, while AI Builder needs to go through Power Automate, AI Builder, then Document Intelligence |
| Payment | Document intelligence can be paid via Azure subscriptions, while AI Builder requires Microsoft software licenses for users |
| Setup | Document intelligence is simpler to setup but requires elevated permissions, while AI Builder is a no-code/low-code solution |
| Usage | AI Builder simplifies and leverages Document Intelligence for users in Power Platform, while Document Intelligence offers advanced capabilities for developers |
| Data | Document intelligence is better at finding payment information, while AI Builder usually have higher confidence rates |
| Costs | We observed similar costs between both options |
Recommendation
Although both options are perfectly suited for extracting vendor information from invoices, from an end user perspective, Document intelligence is preferred for it's performance and improved ability to retrieve payment details.
Testing
Use the Eftsure Parameters > AI > Documents Tab to test the output of both tools:
Upon analysing any documents, the following additional information will be made available for troubleshooting:
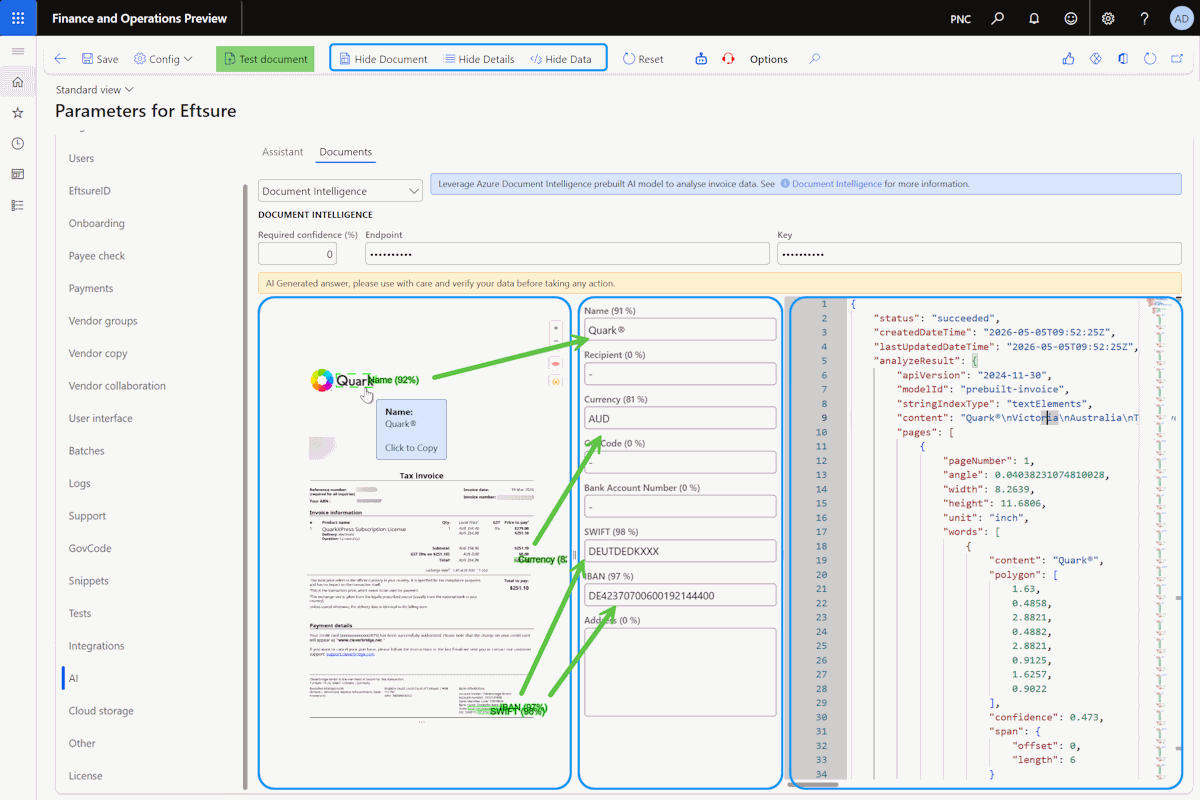
This testing screen contains 3 main testing results pane, from left to right
- Heat Map: Contains all fields as displayed on the document
- Details: Extracted mapped data
- Data: Visualisation of webservice data
Use these tools to validation the solution for your requirements.
Extensions
We provide delegate during Payee Check to allow further enhancements via Event subscription:
[SubscribesTo(formStr(PESPayeeCheck), delegateStr(PESPayeeCheck, onVendTableCreated))]
public static void PESPayeeCheck_onVendTableCreated(VendTable v, PES.Tools.WSContent wsContent)
{
}
[SubscribesTo(formStr(PESPayeeCheck), delegateStr(PESPayeeCheck, onCustTableCreated))]
public static void PESPayeeCheck_onCustTableCreated(CustTable v, PES.Tools.WSContent wsContent)
{
}
The results of the document intelligence are stored in the form's response member as a PES.AI.DocumentScan.DocumentScanResult Object, and can be used for further processing, or creating matching vendor purchase order / invoice... Let's consider the following example:
using System;
using System.Text.Json;

[SubscribesTo(formStr(PESPayeeCheck), delegateStr(PESPayeeCheck, onVendTableCreated))]
public static void PESPayeeCheck_onVendTableCreated(VendTable v, PES.Tools.WSContent wsContent)
{
    //Example for gathering Shipping address from Business Intelligence data
    JsonDocument document = JsonDocument::Parse(wsContent.GetWSContent());
    JsonElement root = document.RootElement;
    LogisticsPostalAddress LogisticsPostalAddress;

    if (root.GetProperty("analyzeResult").ValueKind != JsonValueKind::Undefined)
    {
        JsonElement analyzeResult = root.GetProperty("analyzeResult");
        if (analyzeResult.GetProperty("documents").ValueKind != JsonValueKind::Undefined)
        {
            JsonElement documents = analyzeResult.GetProperty("documents");
            if (documents.GetArrayLength() > 0)
            {
                JsonElement firstDoc = documents.GetValue(0);
                if (firstDoc.GetProperty("fields").ValueKind != JsonValueKind::Undefined)
                {
                    JsonElement fields = firstDoc.GetProperty("fields");
                    if (fields.GetProperty("ShippingAddress").ValueKind != JsonValueKind::Undefined)
                    {
                        JsonElement shippingAddress = fields.GetProperty("ShippingAddress");
                        if (shippingAddress.GetProperty("valueAddress").ValueKind != JsonValueKind::Undefined)
                        {
                            JsonElement valueAddress = shippingAddress.GetProperty("valueAddress");
                            if (valueAddress.GetProperty("streetAddress").ValueKind != JsonValueKind::Undefined)
                                LogisticsPostalAddress.Street = valueAddress.GetProperty("streetAddress").GetString();

                            if (valueAddress.GetProperty("suburb").ValueKind != JsonValueKind::Undefined)
                                LogisticsPostalAddress.City = valueAddress.GetProperty("suburb").GetString();

                            if (valueAddress.GetProperty("state").ValueKind != JsonValueKind::Undefined)
                                LogisticsPostalAddress.State = valueAddress.GetProperty("state").GetString();

                            if (valueAddress.GetProperty("postalCode").ValueKind != JsonValueKind::Undefined)
                                LogisticsPostalAddress.ZipCode = valueAddress.GetProperty("postalCode").GetString();

                            if (valueAddress.GetProperty("countryRegion").ValueKind != JsonValueKind::Undefined)
                                LogisticsPostalAddress.CountryRegionId = valueAddress.GetProperty("countryRegion").GetString();
                        }
                    }
                }
            }
        }
    }
}