Vendor collaboration
This document describes the vendor collaboration module in relation to Eftsure extension. Vendor collaboration is totally optional but fully supported. Activation of this module is at the customer's sole discretion and can be activated any time after Go Live. For more information, please see Vendor Collaboration with External Vendors
If you have never heard of vendor collaboration and do not intend to give your suppliers access to your ERP, please skip this entire section on vendor collaboration.
Vendor collaboration is only available for cloud deployments, not available for on-premises deployments: Cloud Prem comparison
The Vendor collaboration module is targeted at vendors who don't have electronic data interchange (EDI) integration with Dynamics 365.
Vendor Collaboration allows your organisation to grant external supplier guest access to D365F&O Vendor Collaboration Workspace, and depending on permissions, allows vendors work with purchase orders (POs), invoices, consignment inventory information, and requests for quotation (RFQs), and see/edit parts of their vendor master data.
With Eftsure extension, D365F&O is now designed to grant Vendor Collaboration in multiple ways:
- Using Eftsure invitations: Supplier registration performed through Eftsure forms.
- Using D365F&O Vendor registration wizard and then sending the supplier to Eftsure.
- Manual vendor collaboration: Activation after creation, at any stage.
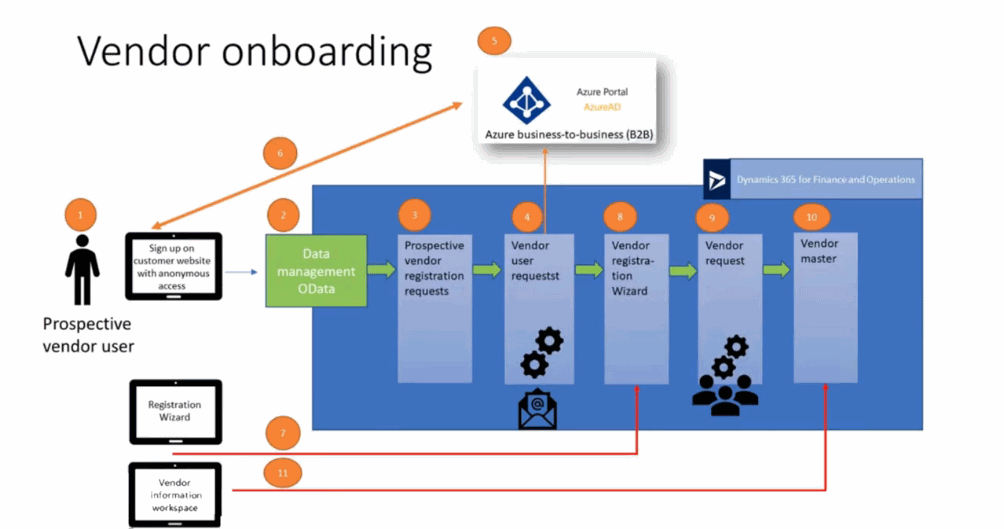
Prior to Vendor registration wizard flow, an optional flow exists where the vendor can request registration on an external anonymous website. A suggested implementation of such website is documented in the technical guide, relying on Microsoft technologies. Our customers can reproduce this solution or use other solutions at their discretion, or even a combination of manual and external requests.
Revoking access to Vendor Collaboration for a supplier has to be performed manually by either:
- Revoking supplier user's access(es) (one or more users)
- Revoking supplier level access. (all users for this supplier)
Microsoft has elected to expose only a limited selection of the supplier information on Vendor Collaboration (main info, contacts, addresses...). For a lot of valid reasons, Microsoft has not exposed banking information to the supplier in their implementation of Vendor Collaboration.
Due to the nature of Eftsure extension, we decided to expose the supplier's own banking information, so that the suppliers can check the bank accounts your organisation has on file for them and confirm they will be paid where they expect.
Configuration allows the customer organisation to set the bank account information as read-only or editable per vendor group. For read-only, the suppliers have no means to change their bank account via their access through vendor collaboration. Instead, we provide them with a new button to request that someone in your organisation sends them a onboarding form to update their details.
To our knowledge, all onboarding methods offer the same features (collaboration, custom onboarding fields...), but in a different way, that can impact your processes or require further development. Therefore, we recommend you choose your onboarding method(s) with care and test all scenarios to understand the impact of each method.
Setup
System
Vendor collaboration is turned-off by default on all Dynamics 365 F&O instances and it takes manual setup to get started.
Vendor collaboration relies on many Web/Cloud/Azure/AAD/Microsoft technologies and can be quite difficult to setup, require many elevated permissions to deploy in a complex modern environment. Implementation of this workflow should be planned with care, well in advance, and can add significant overhead to your project.
Please follow standard documentation to setup Vendor collaboration or ask us for assistance to deploy this feature. This feature is a standard Microsoft D365F&O feature, well documented by Microsoft, and therefore the configuration of this feature is not covered in this document.
For more information, including security, the most accurate information, at the time of writing:
Amongst others, AAD B2B requires the setup of an Azure enterprise application, and configuration of this application in System Administration > Setup > B2B Invitation Configuration.
The following processes, which describes different onboarding methods for the supplier, uses the same setup configuration. Further to the standard configuration, Vendor Collaboration has to be manually turned on in the Eftsure parameters form before being enabled in our features.
Eftsure parameters
All setup options for this module are available in the workspace Eftsure > Button Setup. These options will help you define how to change the behaviour of this module, set default values, change form appearance and many more...
To change this configuration, you will require the PESConfigure duty, see Security section in Eftsure inside D365 FO -- Technical guide for more details.
This tab specifies the configuration and behaviour of Vendor collaboration for this module.

General activation options are available,
Setup for vendor collaboration email and HTML snippets are available per company, the following variables are available at runtime:
| Name | Description |
|---|---|
| %portalURL% | URL to the current environment, used for vendor collaboration link |
| %VendorName% | Name of the selected vendor |
| %VendorAccount% | Account number of the selected vendor |
| %FirstName%, %LastName% | First and Last names of the default contact |
| %UserName%, %UserEmail% | Sender details (Name, email) |
| %Message% | Message composed by the user during send link process, based on snippets |
| %DefaultBankAccount_AccountNum% | BSB for the default bank account |
| %DefaultBankAccount_RegistrationNum%, %DefaultBankAccount_RegistrationNumXXX% | Bank account number for the default bank account of the selected vendor (Full and last 3 digits only version) |
HTML tests are available for Vendor Collaboration Wizard display changes.
Using Eftsure onboarding invitations
This process is very simple, and lets you benefit from the power of Eftsure secure onboarding process. The only difference for the user is to activate vendor collaboration either on the invitation wizard or on the onboarding screen, and Eftsure extension will take care of the rest for you, it will grant access to the supplier and provide the appropriate permissions as per standard.
Step 1: Invite Supplier
This action is performed by your AP department.
On the onboarding lists, this option is available as the first column, in order to quickly highlight which suppliers have been granted access to your ERP.

Or this option can be enabled before inviting the supplier, directly in the onboarding wizard. Some Vendor Group configurations might hide the vendor collaboration option:
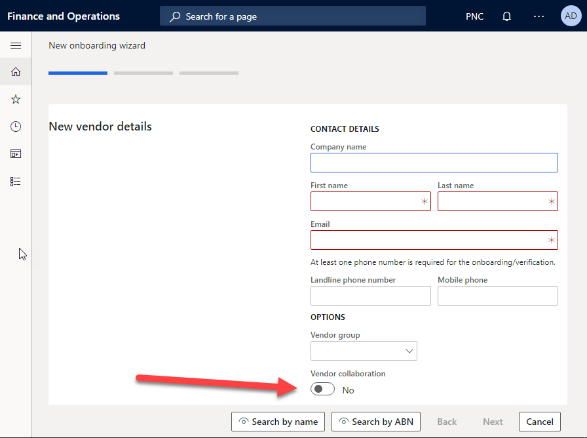
Step 2: Supplier registration
This action is performed by the supplier.
When the supplier completes onboarding in the Eftsure portal, there is no noticeable changes to a standard onboarding as described previously, the onboarding forms stay exactly the same, all computation is performed in D365FO.
Step 3: Accept supplier onboarding
This action is performed by your AP Department.
The AP clerk reviews the supplier information and, if necessary, works with the supplier until the onboarding is complete (Using Incomplete Workflow).
Once the supplier information in the supplier onboarding is valid, the AP Clerk accepts the onboarding information.
Step 4: Vendor creation
Vendor creation is achieved through a single click on the Vendor Create button in the onboarding form, or during onboarding status change (to Accepted).
During supplier creation, Eftsure extension creates the supplier, bank information, contact info, addresses, etc...
Upon completion, the supplier user will receive a B2B invitation from Azure AAD B2B for external guest access, that grants them access to your ERP.
B2B Invitation Configuration
The B2B invitation configuration uses the standard B2B configuration in System Administration > Setup > B2B Invitation Configuration, and automates all steps required to create a B2B user in the system (Refer to Configuration)
The vendor registration process follows the configuration of Vendor requests configurations, available in Procurement and Sourcing > Setup > Vendors.
This form allows the user to configure the behaviour and look & feel of the registration wizard per country. Many features are available to show/hide additional information, such as questionnaires, fields, terms and conditions...
This form has been extended to support registration attachments.
Configuration - Attachments
A new Attachments section has been created to configure attachments.
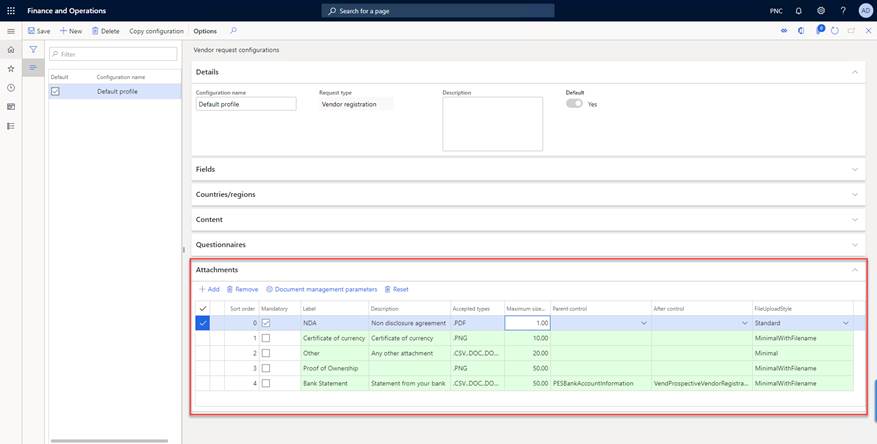
This new section allows the user to configure attachments for the supplier registering its organisation.
Key features:
- Ability to sort, specify mandatory, allowed file types, maximum size
- Ability to position attachment lookup inside a parent control and after another control
- Ability to change upload control style
- Values default from Document management parameters for file types allowed and maximum size
- Auto lookup for Parent Control and After Control based on Registration configuration
- Grid colouring Red/Green depending on valid line status Validate File types in allowed in Document Management Parameters
- Validate Max size is less than configuration in Document Management Parameters
When the new supplier registers, we have further extended the registration wizard to add new file upload controls matching the previous configuration. The attachments are separated in 2 ways:
- Attachments without Parent control
- Attachments with Parent control and / or After control
First, attachments not configured relative to other controls -- Parent Control Empty AND After Control Empty
These are all displayed together in a new last tab named 'Attachments'. Example below matches configuration above #1 (Red), #2 (Green), #3 (Yellow)
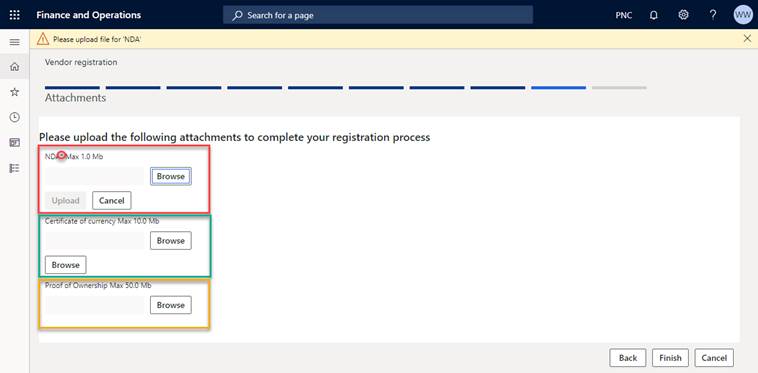
Key features:
- New Tab page for all attachments setup with no parent
- New Tab hidden if no such attachments
- Mandatory fields displayed with star in label, no native mandatory red feature currently available for file uploads.
- Supports 3 styles for uploads (Minimal (Yellow), MinimalWithFileName (Green), Standard (Red))
- Validation of file types and file sizeSorting attachments by position
- Validation of mandatory attachments on Next in infolog warnings
Regarding attachments positioned relative to other controls, they will appear positioned relative to other controls!
For example, control #4 in the configuration above would be represented like the following (Parent control PESBankAccountInformation, After control VendProspectiveVendorRegistration_PESAccountNum)
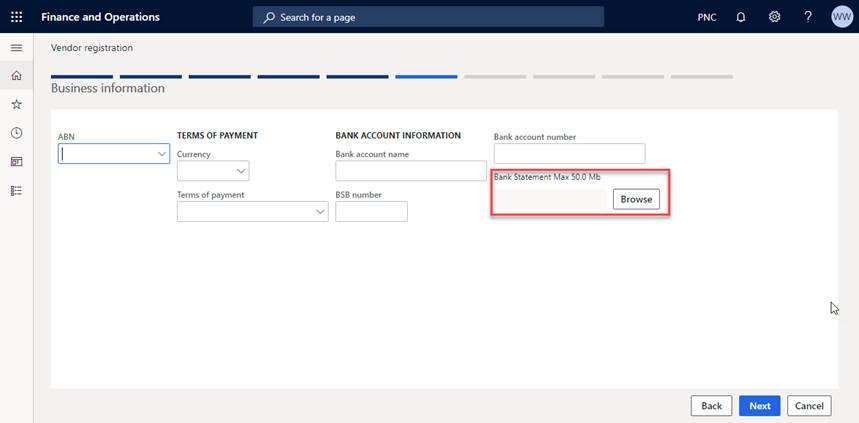
Key features:
Same as previous plus ability to position attachment inside a control container and optionally after a child control in this container, otherwise last.
Step 1: Invite Supplier user for the detailed process that is automated here.
This email template is a system email template that can be customised using D365FO features. You can select which email template to use for this invitation in System Administration > Workflows > User Workflow parameters.
We recommend you include your own marketing identity as well as additional text to notify the supplier to now login into your ERP and complete their registration wizard, in order for the workflow to continue.
At this point, the supplier has registered their information in Eftsure, and the supplier has been created in D365FO, from this point on, the supplier can login anytime into the vendor collaboration portal, until such access is revoked.
Troubleshooting
Troubleshooting this workflow is quite easy, and performed using the following tools:
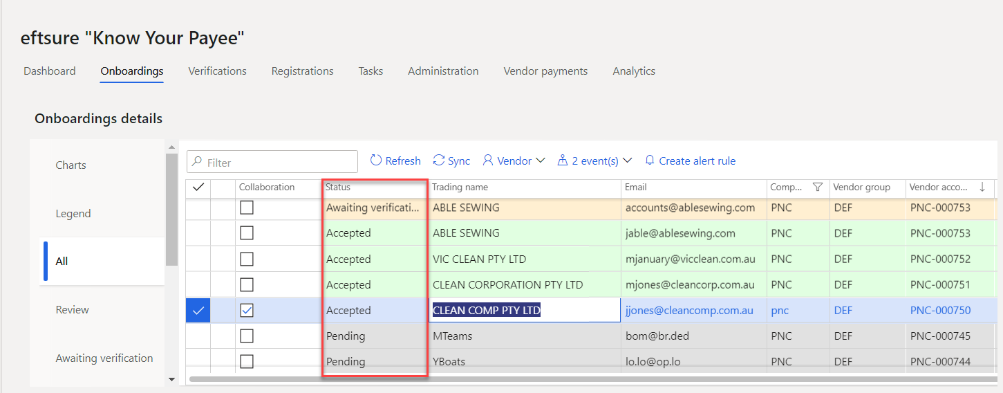
Q: What is the status of my onboarding?
A: Eftsure > Onboardings
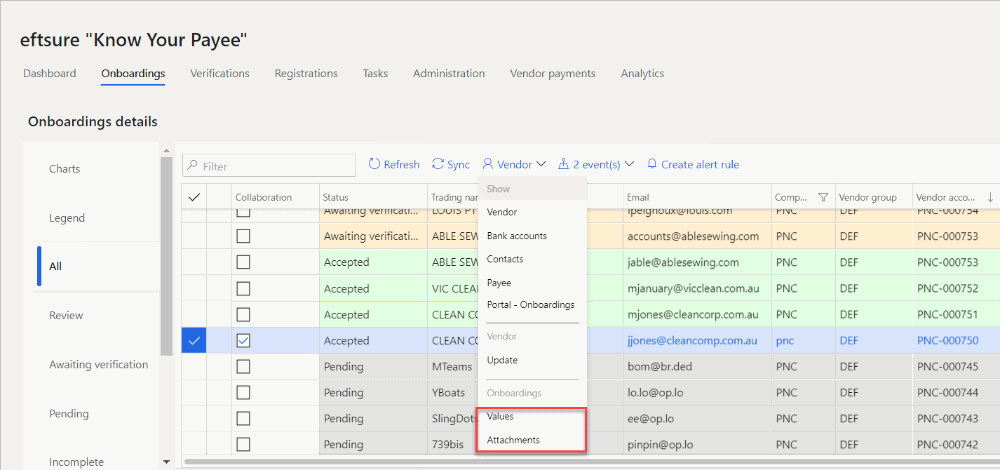
Q: What is the vendor information before I approve it?
A: Eftsure > Onboardings > Show > Values or Attachments
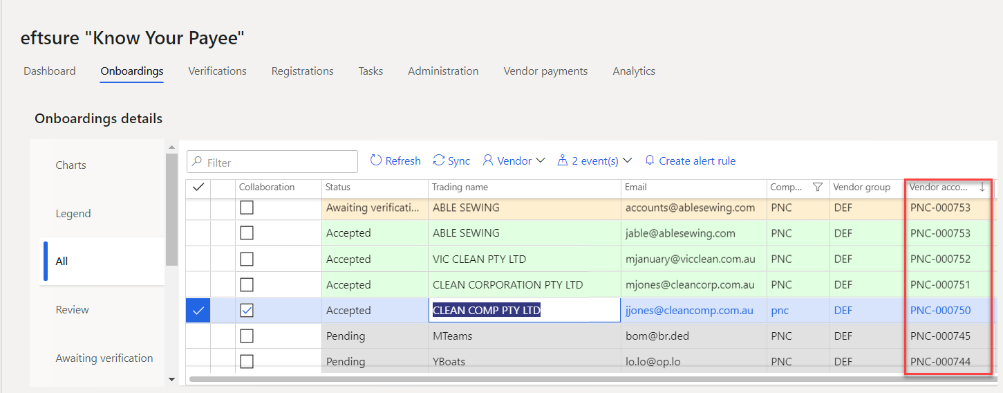
Q: Has my vendor been created already?
A: Eftsure > Onboardings > Vendor Account
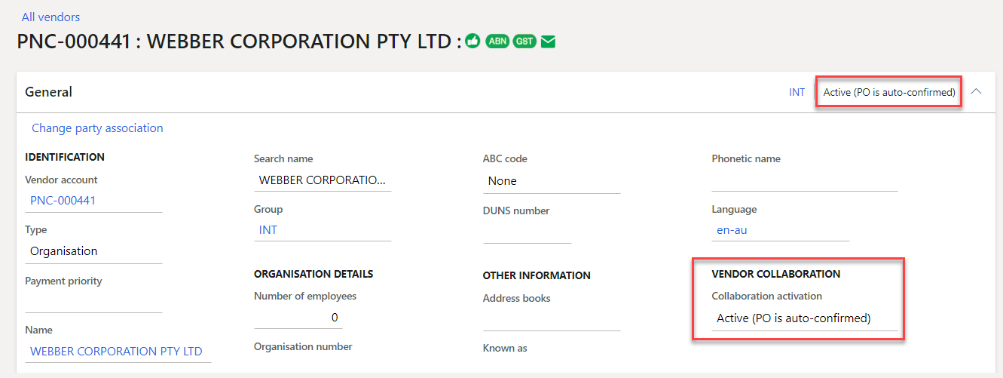
Q: Is my vendor enabled for vendor collaboration?
A: Accounts Payable > Vendor Card > Vendor Collaboration group
Q: Are my vendor's users enabled for vendor collaboration?
A: Procurement and sourcing > Vendors > Vendor collaboration requests > Vendor collaboration user requests

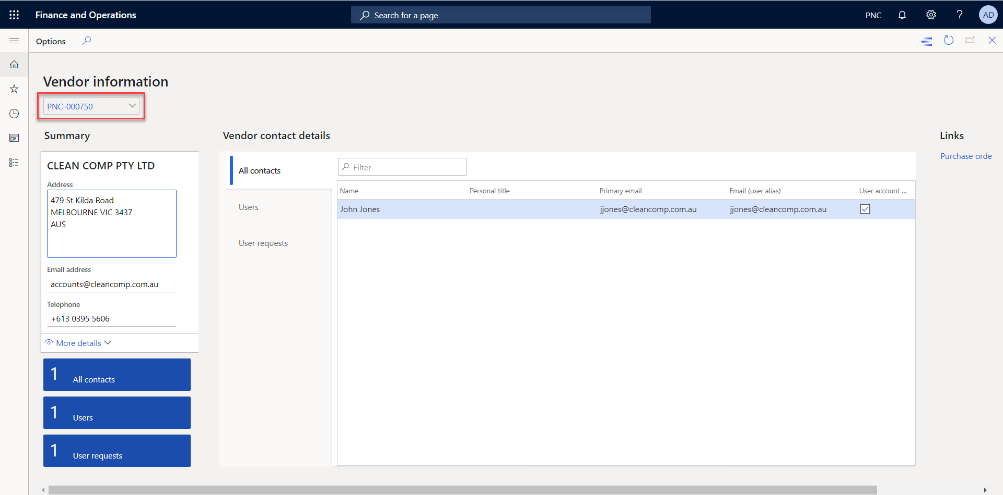
Q: What does the supplier access to D365 F&O look like?
A: Vendor Collaboration > Vendor information Workspace > Select Vendor in top left corner.
Q: Has my vendor's user logged in?
A: System Administration > Inquiries > User log
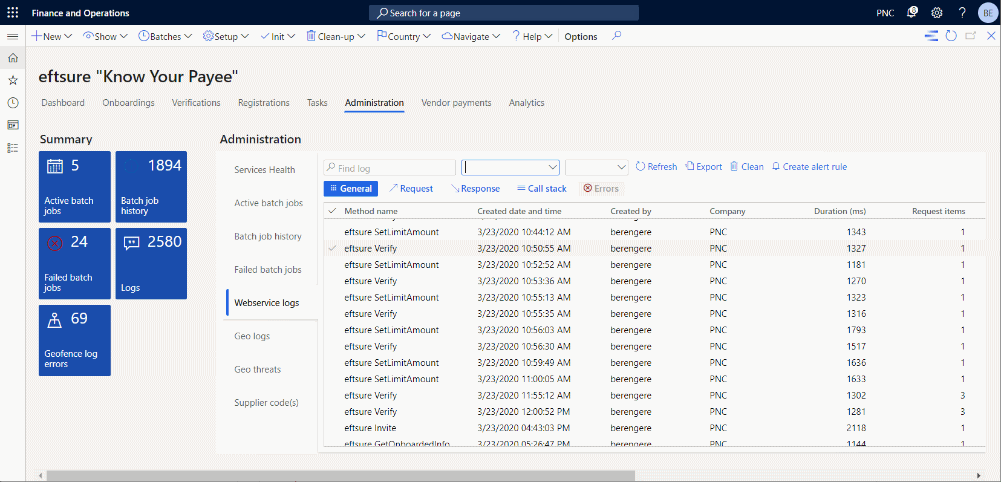
Q: Has the communication been sent to Eftsure?
A: Eftsure Workspace > Administration > Webservice logs
Q: How do I request further information from the supplier?
A:* Eftsure > Onboardings > Verification
Using D365F&O standard onboardings
This process is completely different from Vendor Collaboration with Eftsure invitation.
This process leverages most of the standard features, uses standard workflows and staging areas, which have all been extended to accommodate for bank account information (not covered initially by Microsoft).
See our vendor collaboration onboarding process
This process has been covered over a 6-minute video that will give you the insights from an AP department and from a supplier point of view.
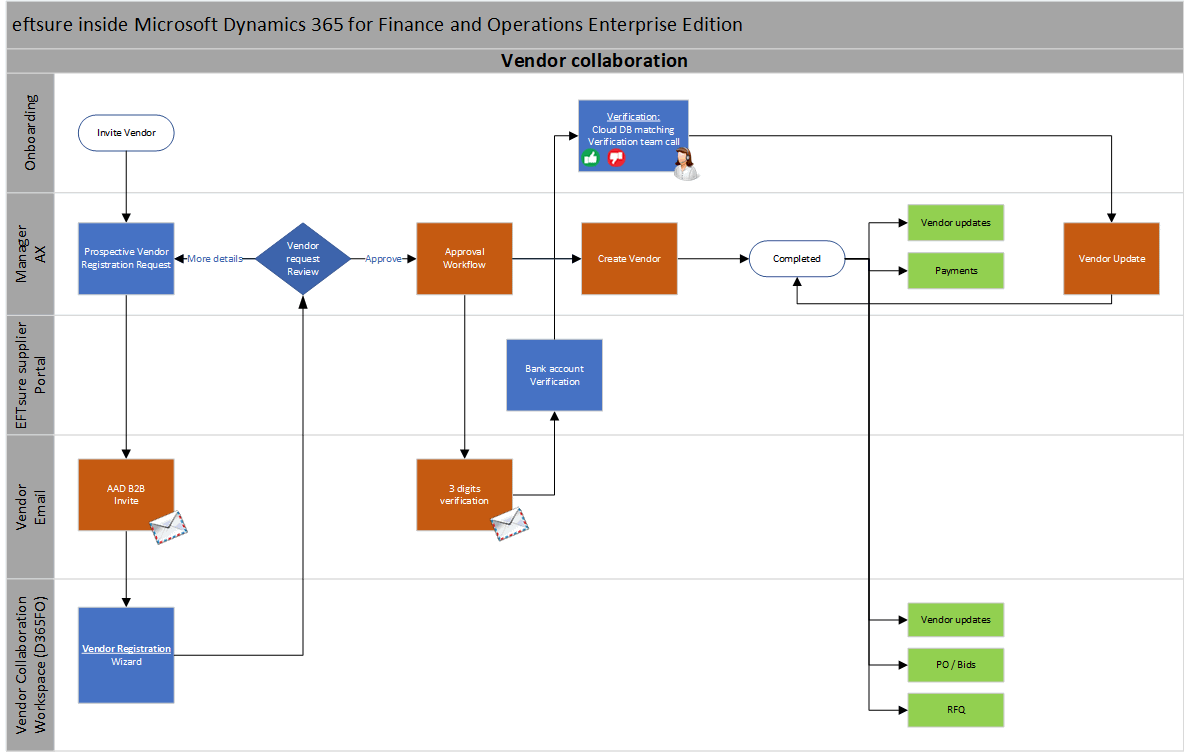
The following cross functional diagram details everyone's role for onboarding:
Configuration
The vendor registration process follows the configuration of Vendor requests configurations, available in Procurement and Sourcing > Setup > Vendors.
This form allows the user to configure the behaviour and look & feel of the registration wizard per country. Many features are available to show/hide additional information, such as questionnaires, fields, terms and conditions...
This form has been extended to support registration attachments.
Configuration - Attachments
A new Attachments section has been created to configure attachments.
This new section allows the user to configure attachments for the supplier registering its organisation.
Key features:
- Ability to sort, specify mandatory, allowed file types, maximum size
- Ability to position attachment lookup inside a parent control and after another control
- Ability to change upload control style
- Values default from Document management parameters for file types allowed and maximum size
- Auto lookup for Parent Control and After Control based on Registration configuration
- Grid colouring Red/Green depending on valid line status
- Validate File types in allowed in Document Management Parameters
- Validate Max size is less than configuration in Document Management Parameters
When the new supplier registers, we have further extended the registration wizard to add new file upload controls matching the previous configuration. The attachments are separated in 2 ways:
- Attachments without Parent control
- Attachments with Parent control and / or After control
First, attachments not configured relative to other controls -- Parent Control Empty AND After Control Empty
These are all displayed together in a new last tab named 'Attachments'. Example below matches configuration above #1 (Red), #2 (Green), #3 (Yellow)
Key features:
- New Tab page for all attachments setup with no parent
- New Tab hidden if no such attachments
- Mandatory fields displayed with star in label, no native mandatory red feature currently available for file uploads.
- Supports 3 styles for uploads (Minimal (Yellow), MinimalWithFileName (Green), Standard (Red))
- Validation of file types and file size
- Sorting attachments by position
- Validation of mandatory attachments on Next in infolog warnings
Regarding attachments positioned relative to other controls, they will appear positioned relative to other controls!
For example, control #4 in the configuration above would be represented like the following (Parent control PESBankAccountInformation, After control VendProspectiveVendorRegistration_PESAccountNum)
Key features:
Same as previous plus ability to position attachment inside a control container and optionally after a child control in this container, otherwise last.
Step 1: Invite Supplier user
This step is performed by your AP department.
To onboard a new supplier using this workflow:
-
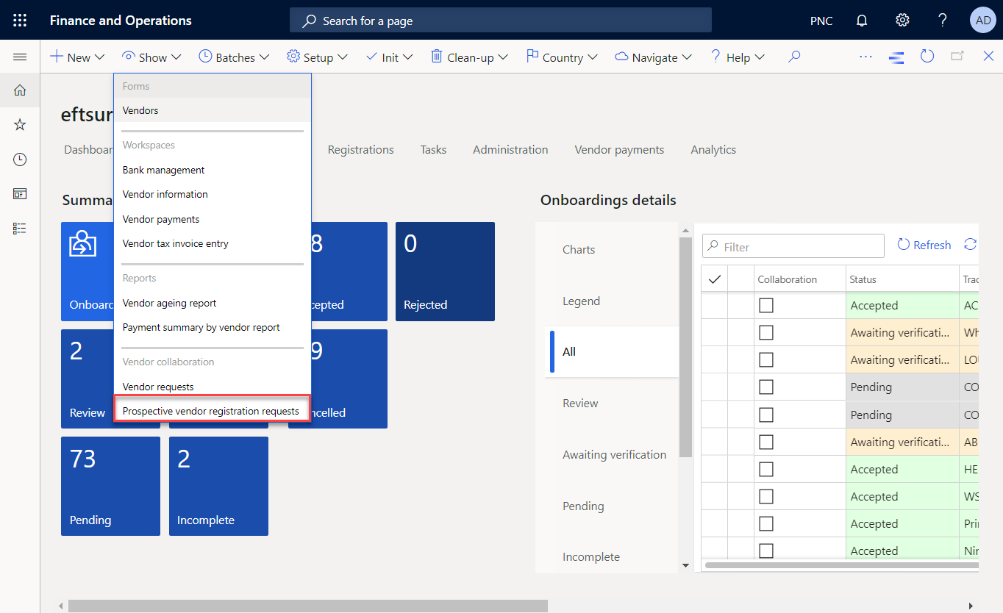
Go to Procurement and sourcing > Vendors > Vendor collaboration requests > Prospective vendor registration requests,
-
Or use our new shortcut directly available in your Eftsure workspace, select menu Show\Prospective Vendor Registration Requests.
The form displays the list of Vendor requests.
Hit the New button to create a new record in this form, with all necessary information.

Upon saving the record, hit the Invite user button.

This process submits a request to create a new user with prospective vendor privileges.
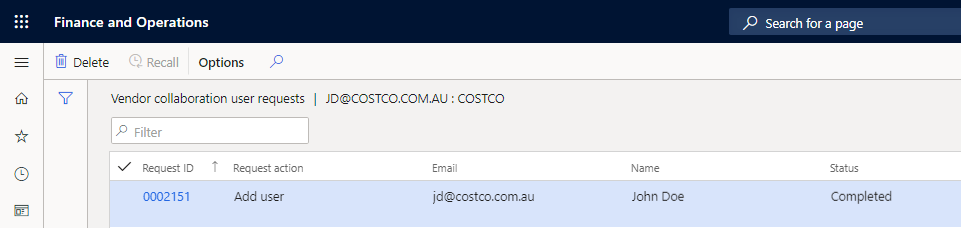
Once your request has been processed, the status of the vendor registration request will be set to User invited.
If you now select the Prospective vendor user requests button at the top of the screen, you will see that an invitation is being processed/sent:
Workflow Vendor user request (new user or modify user)
This user request has been triggered by the Workflow named Vendor user request (new user or modify user).
This workflow can be further customised to match your organisation's security requirements (multi-approval, security/background checks pending...). It is configured in System Administration > Workflows > User Workflows.
Once this workflow completes, the supplier's user receives an AAD B2B external guest access email to access your organisation. The default email template will produce the following email, which arguably may require minimal visual improvements for an external communication to your suppliers:
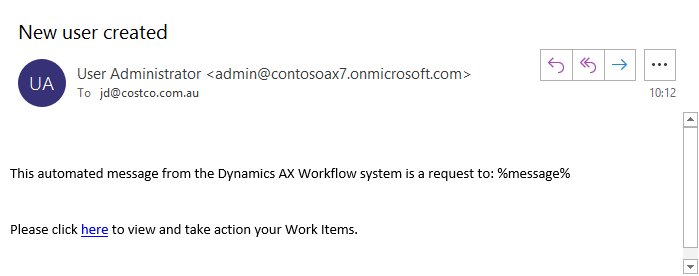
AAD B2B external guest access configuration
This email template is a system email template that can be customised using D365FO features. You can select which email template to use for this invitation in System Administration > Workflows > User Workflow parameters.
We recommend you include your own marketing image as well as additional text to notify the supplier to now login into your ERP, to complete their registration wizard, in order for the workflow to continue, and ultimately receive your payments.
Step 2: Supplier registration
This step is performed by the supplier, after receiving an AAD B2B invitation.
The supplier logs into your D365FO Live instance using their work email address (any email from any provider are accepted here).
Immediately after initial login, the supplier will be presented with the Supplier registration wizard.
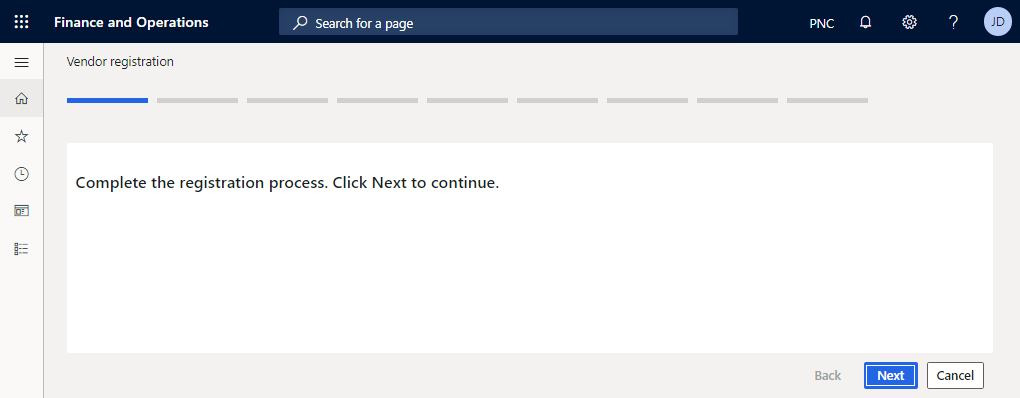
Even though the vendor user has already been granted access to your ERP, the Vendor doesn't exist in the system yet, just in a staging area named Prospective Vendor Registration Requests. The vendor user is restricted to the registration Wizard, and as the supplier doesn't exist yet, no access to Vendor Collaboration workspace is possible at this stage. The user has no other choice than to complete the registration wizard.
Eftsure has extended the standard registration process, more specifically the business information step of this wizard, to accommodate for bank accounts:
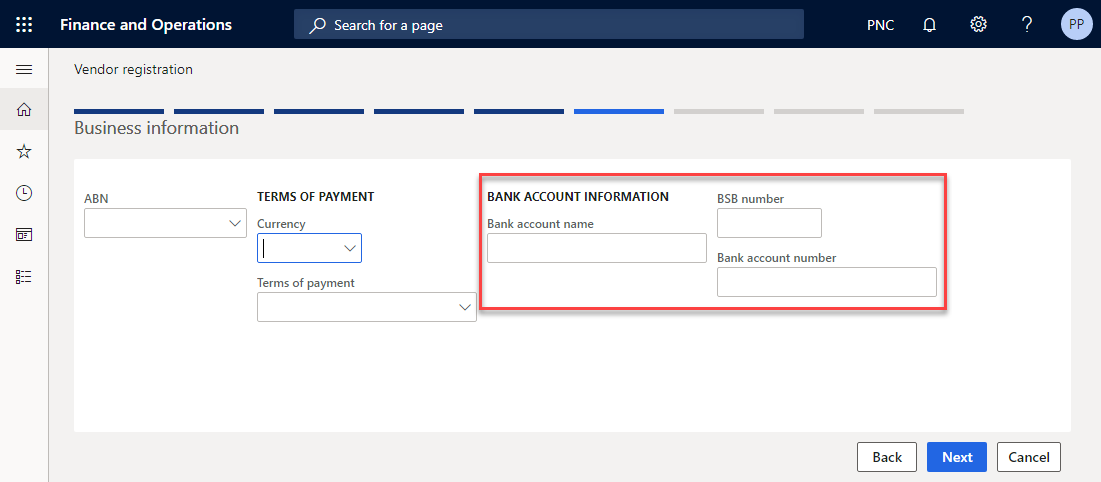
Depending on setup, the bank account information is either Not displayed, Displayed, Required. You can specify this setting directly in the Vendor request configuration form.

For Australian localisations, we also extended the custom ABN lookup feature to allow the suppliers to search their ABN by names or ABN number to confirm with the ABR office that the number typed matches their expectations.

This feature is only enabled for Australian companies and the ABR Guid for webservices has been configured.
The wizard is composed of the following main steps, which can be further configured and customised:
-
Country/Region,
-
Terms and Conditions,
-
Vendor information,
-
Contract Person information,
-
Business information (including bank details),
-
Procurement categories,
-
Questionnaires.
To configure your Supplier registration wizard, go to Procurement and sourcing > Setup > Vendors > Vendor request configurations.
Once the prospective vendor user completes the vendor registration wizard, a Vendor request is created with the supplier information as entered in the registration wizard.
At this stage, the vendor request status becomes "Pending Approval", and the standard process has been extended to check the ABN information specified by the supplier, if an ABN Webservice GUID has been configured in the parameters. This ABN Check information will be displayed later on to facilitate user review.
Step 3: Vendor request
This step is performed by your AP Department, after the supplier has completed their registration.
The supplier information is now ready for your review, before being created as a real vendor in the system:
-
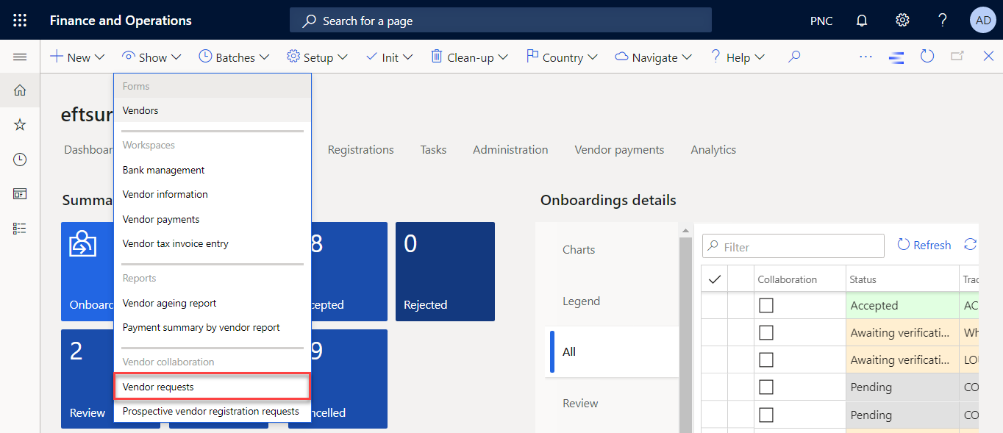
Go to Procurement and sourcing > Setup > Vendors > Vendor requests,
-
Or use our new shortcut directly available in your Eftsure workspace, select menu Show > Vendor requests.
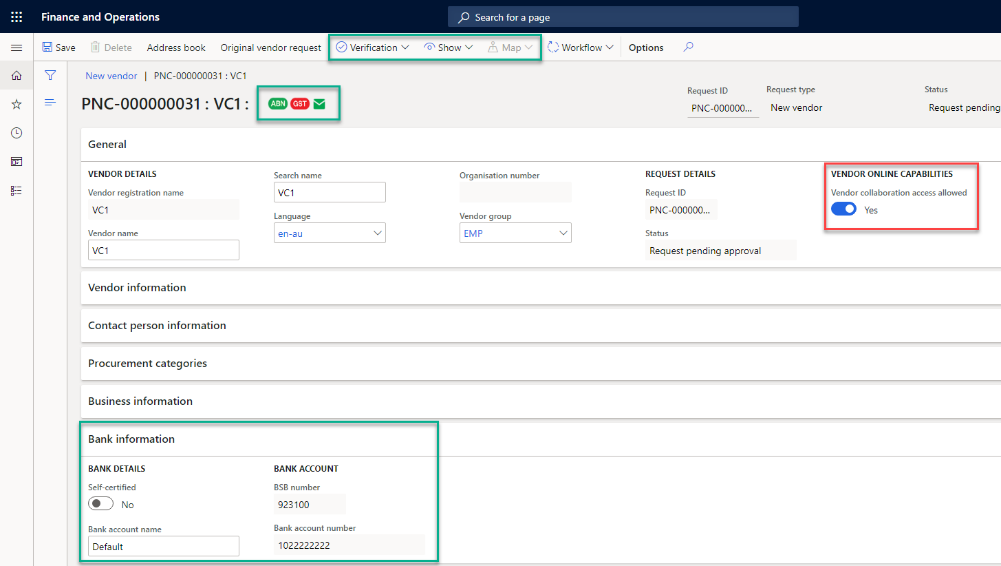
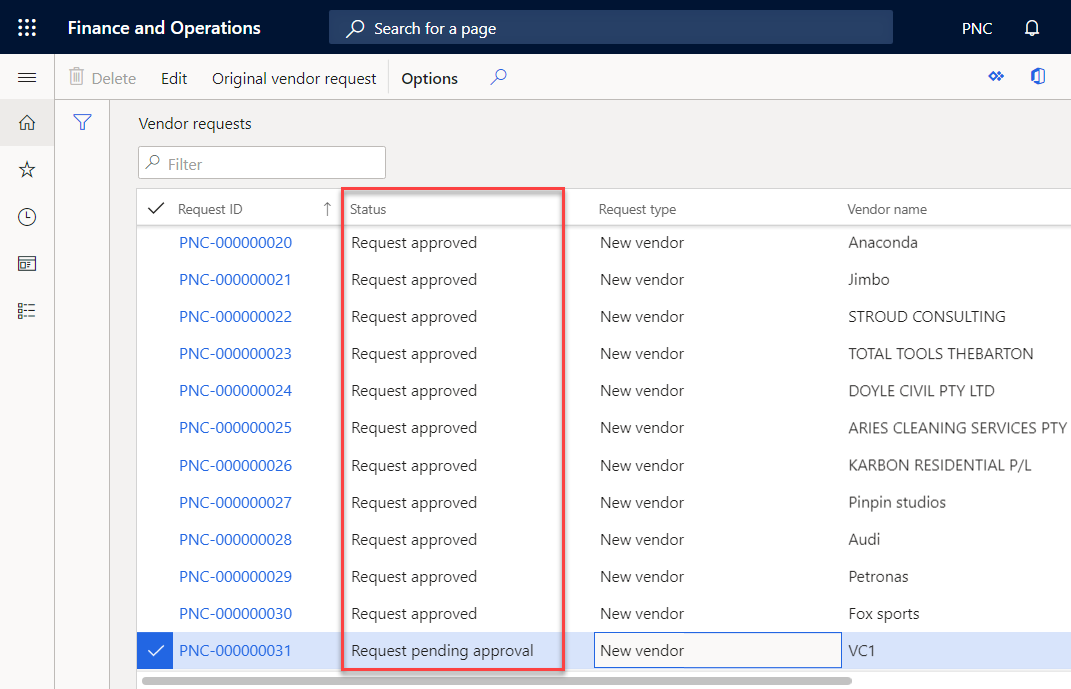
- Locate your Vendor request and click Edit. This request should be in the Request pending approval status.
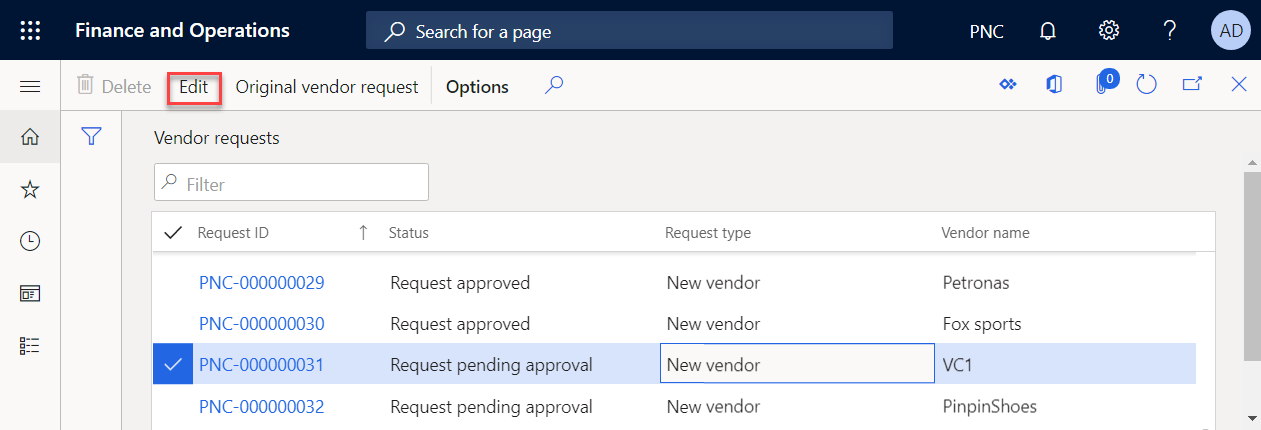
-
Review and amend the supplier as per your organisation policies and specify a Vendor Group for the new vendor.
-
Make sure the standard process has enabled the Vendor collaboration access allowed checkbox.
-
Just like any other supplier, the user can verify ABN and show related records, or display a geolocation of the supplier while registering.
If the information is incorrect or incomplete, go to the Workflow menu and select the appropriate option (either Reject or Additional information required) to continue the registration workflow with the supplier.
If any attachments were configured for this vendor request, the attachments will be visible in the toolbar, just like any other forms.
Step 4: Vendor add application workflow
This step is performed by all team members involved in the Vendor add application workflow. It corresponds to the Vendor creation and is automated in this scenario.
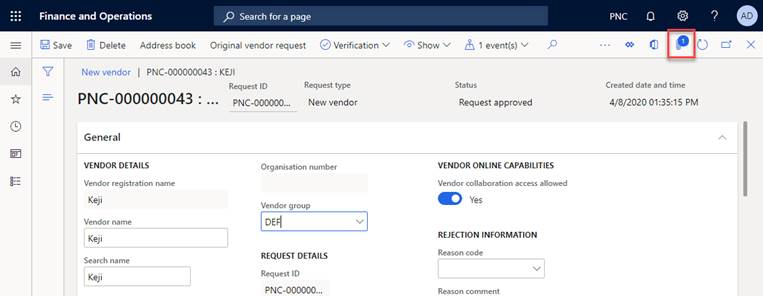
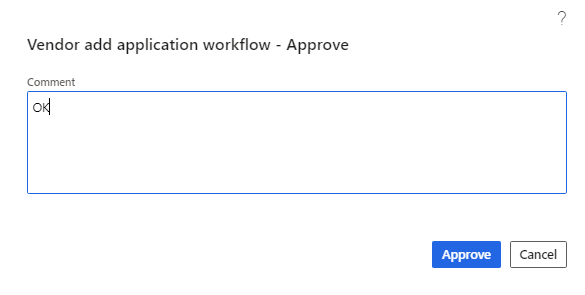
- When the review is completed and satisfies your organisation's policies, go to the Workflow menu, select Approve.

- Enter a comment to start the Vendor creation workflow. The Vendor add application workflow starts and runs all required workflow actions.
You can then monitor the workflow execution status for this new vendor directly on its vendor request. The default vendor collaboration approval request requires a second team member's review through the creation and approbation of a work item.
Vendor add application workflow
The standard workflow is a great basis to further extend to match the requirements of your organisation, but it unlikely to match your real-life scenario out of the box.
In the default workflow, it involves approval of your vendor request using work items. You can configure this workflow in the Procurement and sourcing > Setup > Procurement and sourcing workflows.
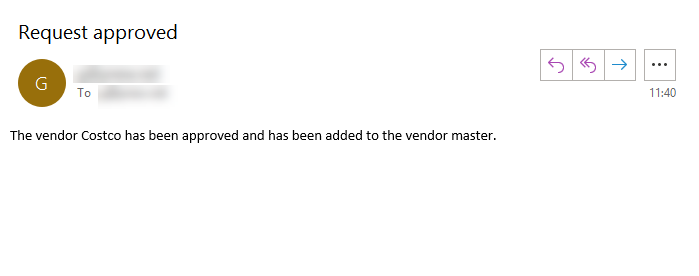
At the end of the process, the Vendor request status changes to Request approved, the supplier has been created in your vendor master file and an email is sent to the requester and looks like the following:
Step 5: Eftsure verification request
This step is performed automatically by the system.
- Eftsure inside D365FO extends the previous flow to further create the supplier bank account, based on the registration information specified directly by the supplier.
Once the vendor has been created, the attachments have been copied over onto the new vendor, and can be visible at any time on the vendor card:
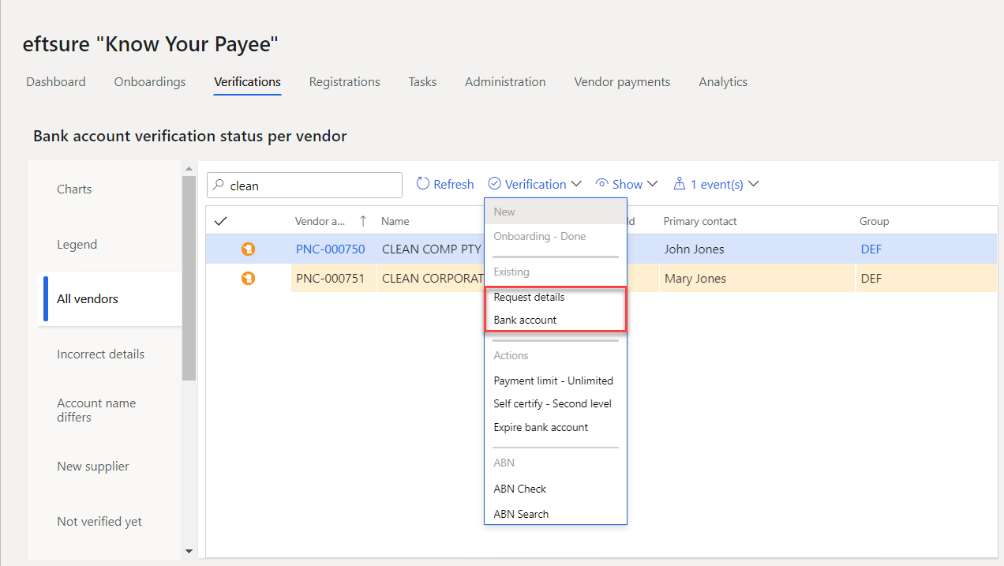
At this stage, from an Eftsure point of view, this supplier is unknown to us, and therefore considered not verified, an orange status. If required, this supplier can be self-certified immediately.
- After creating a bank account for the supplier, our extension will automatically send an Eftsure 3-digit verification request to the supplier to ensure that the banking information is correct.
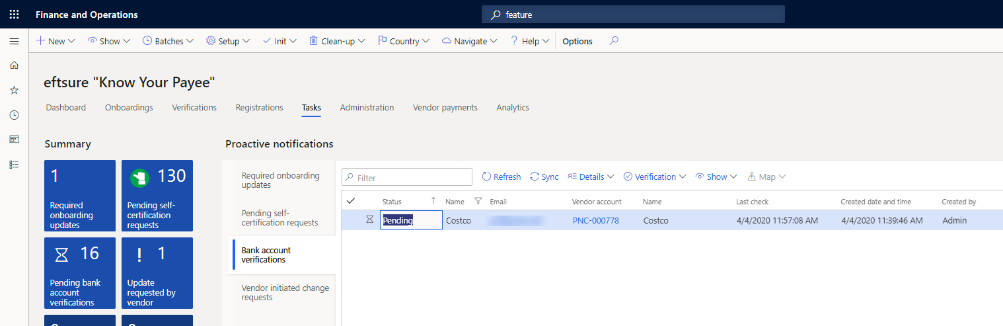
The status of this bank account verification can be monitored in the Tasks section of your Eftsure workspace:
- Once the bank account verification has been completed by the supplier, the vendor will be marked as verified, with a green status.
Step 6: Supplier verifies banking information in Eftsure
This step is performed by the supplier in the Eftsure portal.
The supplier receives a bank account verification request from your organisation, or from Eftsure on your behalf depending on configuration. The supplier then completes their information in the Eftsure portal.
Step 7: Synchronisation
Just like any other verification, periodically, the Eftsure batch jobs will synchronise information from Eftsure, download the latest onboarding information from our crowdsourced database, and update the supplier status to Green or Red, depending on whether the supplier has confirmed bank account information.
This action is also performed manually using the Sync buttons available on the UI.
Step 8: Vendor collaboration link (Change request)
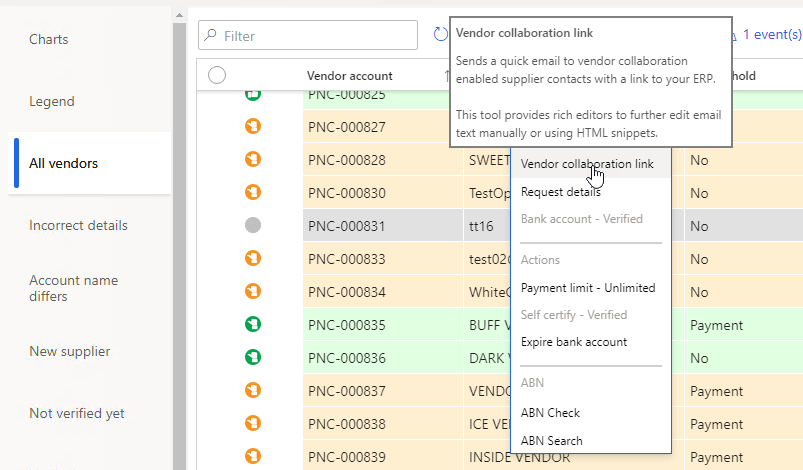
This feature allows the user to send / resend to your vendor an email containing the link to your D365 environment, would he / she to change some information.
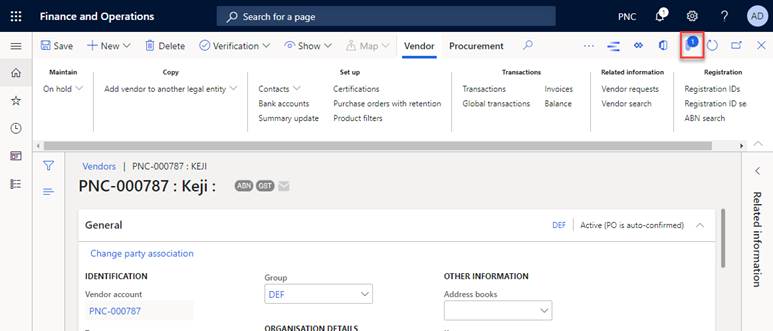
From Eftsure workspace, select an approved prospective vendor, hit the Verification > Vendor collaboration link button in the toolbars:
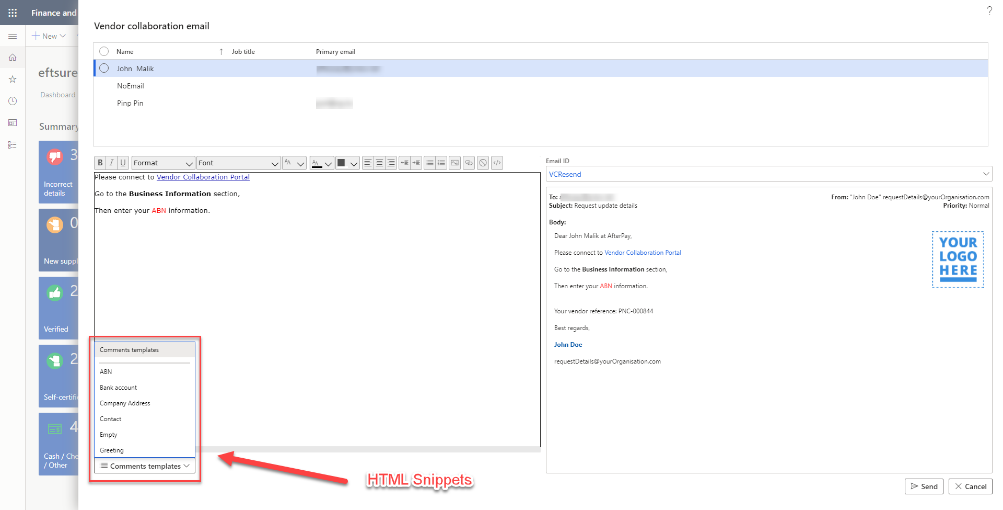
This feature will open the following screen, which simplifies email sending. All contacts enabled for vendor collaboration can be pre-selected to send same email to multiple contacts.
The email body combines:
- A footer and a header configured in Standard D365 templates.
- A message using HTML snippets:
- Configurable from the section Comments templates.
- Selectable in the bottom left of the Vendor collaboration email form.
Troubleshooting
Q: What is the status of my vendor collaboration request?
A: Eftsure > Show > Prospective Vendor Registration Requests > Status > User invited?

Q: Has my vendor received their invite?
A: Procurement and sourcing > Vendors > Vendor collaboration requests > Vendor collaboration user requests > Status > Completed or Review outcome of Vendor user request workflow.
Q: Has my vendor's user logged in?
A: System Administration > Inquiries > User log
Q: Has my vendor completed registration?
A: Eftsure > Show > Vendor requests > Status is Request pending approval or Request approved
Q: What information did my supplier complete during onboarding?
A: Eftsure > Show > Vendor requests, review or edit vendor changes.
Q: How do I ask the vendor for additional information?
A: Eftsure > Show > Vendor requests > Workflow > Reject or Additional information required.
Q: Has my vendor been created already? Why is my vendor not created already?
A: Eftsure > Show > Vendor requests > Workflow > History
Q: Is my vendor enabled for vendor collaboration?
A: Accounts Payable > Vendor Card > Vendor Collaboration group
Q: Are my vendor's users enabled for vendor collaboration?
A: Procurement and sourcing > Vendors > Vendor collaboration requests > Vendor collaboration user requests
Q: What does the supplier access to D365 F&O look like?
A: Vendor Collaboration > Vendor information Workspace > Select Vendor in top left corner.
Q: Has the automation sent the 3-digit bank account verification request?
A: Eftsure > Tasks > Bank account verifications > Status
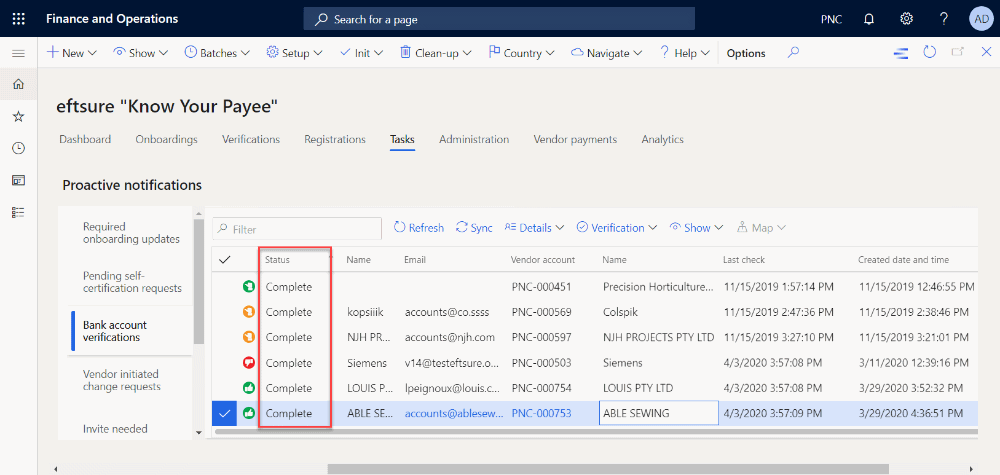
Q: Why is the status of my supplier not green?
A: Eftsure > Tasks > Bank account verifications > Status
Q: Has the 3-digit bank account verification request been sent to Eftsure?
A: Eftsure Workspace > Administration > Webservice logs
Q: How do I request further information from the supplier?
A: You can use Eftsure's 3-digit bank account verification form for bank account information, otherwise changes to the vendor card can be performed manually by your users or by the supplier in the vendor collaboration self-service workspace.
Manual Vendor collaboration
When a vendor has been created manually or via invitation, and has not been granted vendor collaboration, the user can elect to activate vendor collaboration at any stage after. The user will manually setup the supplier for vendor collaboration, and the supplier will automatically see Eftsure extension's feature when using the ERP.
This method of onboarding is totally standard, see the following documentation from Microsoft.
Enable vendor collaboration for a specific vendor
Once a vendor has been activated for vendor collaboration, make sure at least one user is enabled for vendor collaboration:
Manage vendor collaboration users
New features:
In the standard D365F&O vendor collaboration screen, the supplier has the ability to maintain their supplier information, contact details, addresses, but couldn't view or maintain their bank account information.
Due to the nature and risks related to bank accounts, we do not offer the ability for the supplier to change their bank account on their own. However, the supplier can request a bank account change directly from our new bank account information view screen. This workflow will activate a flag on the bank account, and such bank accounts will be listed in the Tasks>Vendor initiated change requests section of your main workspace.
From this screen, the AP clerk can review all change requests triggered by your suppliers and elect to send verifications requests to those suppliers.
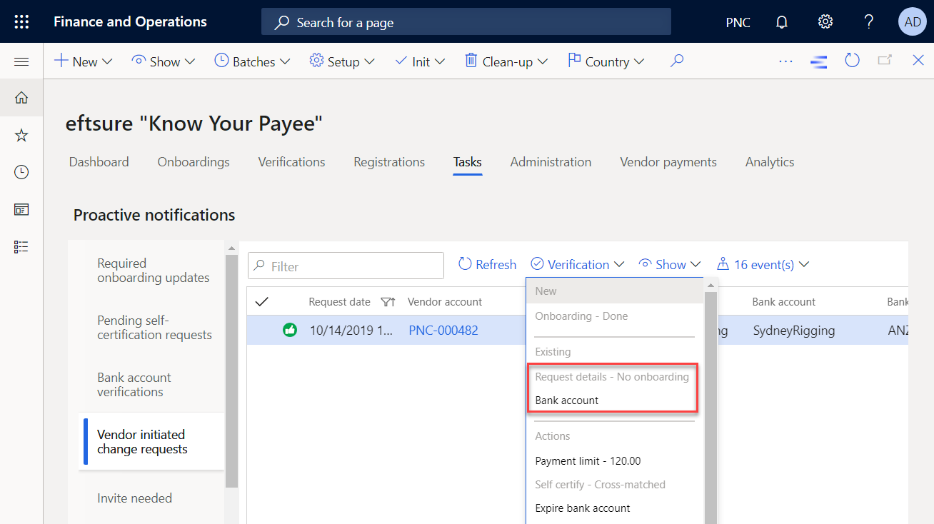
This form, like many others, allow sending multiple verifications requests at once using multi-selection.
Revoking access to Vendor Collaboration
The users can decide to revoke vendor collaboration access to any vendor at any time. The vendor collaboration features are not exposed to Eftsure engine and will not cause any disruption on the Eftsure side.
Disabling vendor collaboration can be achieved at a vendor user level or at a vendor level for all their users. For more information, please refer to Manage vendor collaboration users
Vendor collaboration daily use
Once granted permission to your ERP, the suppliers can edit their information, respond to PO, bids, using the Vendor Information workspace:
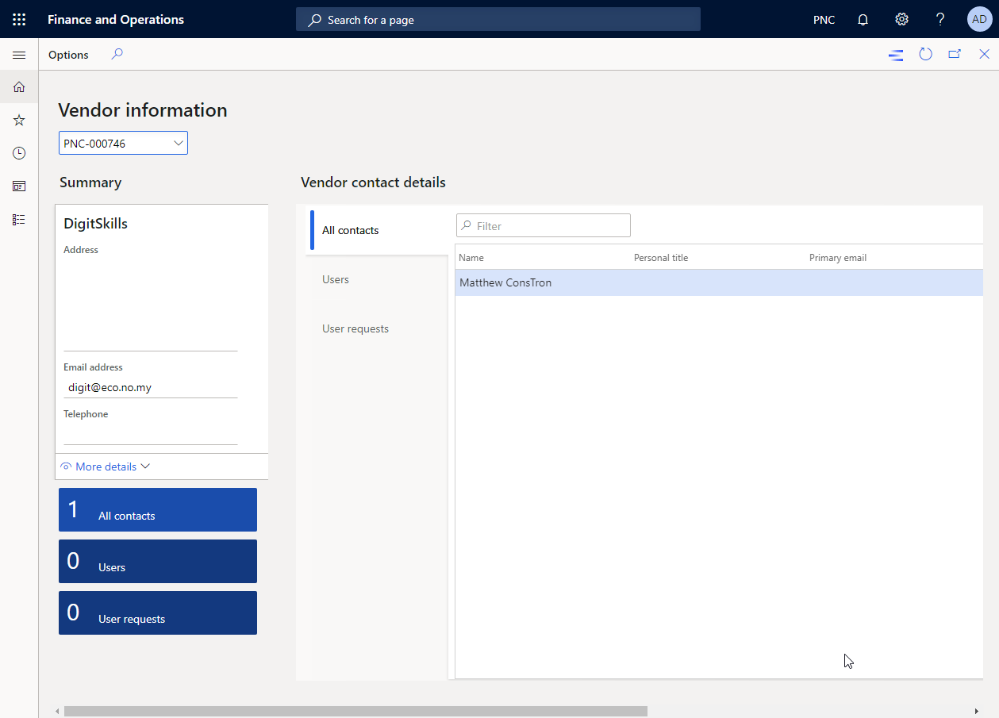
This workspace has been extended to allow the vendor to view / edit their bank details:
The Vendor Group configurations sections allows the user to specify whether a group of vendors will be able to edit their details, which will place their bank accounts into the verification queue.
Otherwise, the bank account information is non editable, and a new Request change button will be displayed so that the supplier can request for an update.
These updates are all queued in the Eftsure Workspace > Tasks panels, and can be triggered by the Change requests auto approval batch job.
Change request
Depending on the onboarding option, change requests can be performed differently:
- Phone/email: Although not recommended, the supplier can phone one of your staff members to perform the change request, in which case less automated workflows are running, and the staff members permissions are used for the change
- Manual: The supplier can change the supplier card directly in the D365FO, depending on their user permission, for everything related to contact information, addresses, supplier information... The supplier can't change their bank account information.
Instead, the supplier has the option to request one of your staff members to approve a change request for their banking information.
- From D365FO invitation: The supplier has to use either of the previous methods.
- From Eftsure invitation: The supplier can change their information in D365FO, and bank accounts via another 3-digit bank account request, requested by the supplier or by your AP departments.
On top of the previous methods, you can also send a standard Eftsure change request. This method is not available if onboarded without Eftsure.
Feature comparison
| Feature | Eftsure onboarding | D365FO onboarding |
|---|---|---|
| New suppliers | Simplified onboarding, 2 addresses, 2 phone numbers, no workflow involved, slightly faster. | D365FO style, overwhelming number of options, unlimited addresses, contacts, phones... Longer workflow with more parties involved, D365 FO workflows involved, slightly slower from user point of view, 6 workflow steps minimum involved |
| New supplier registration | On Eftsure portal, simple and powerful user experience, native rich UI with your logo, 2 step authentications can be set as mandatory to confirm mobile phone numbers. | On D365FO, D365 native UI (designed for end users, not suppliers), with no logo, multiple steps wizard. User experience. |
| Bank account registration | 3 options are available: - Manual entry by the supplier in the registration wizard. - BankLink, supplier logs into bank account, bank provides us with bank account information. Secure, no manual entry - Cash \ Cheque available - 3 digit check if supplier already exists in our crowdsourced database, Secure, manual entry to confirm our known verified information. | Manual entry by the supplier |
| New supplier: Incomplete registrations | Onboarding status incomplete is used to circle back information to the supplier until AP completes or rejects the onboarding | Prospective vendor registration workflow status (Additional information required) is used to circle back information to the supplier until AP approves or rejects the onboarding |
| Change request (existing vendors) | Existing suppliers can be sent an initial invite and subsequent change requests which will update the existing supplier. New suppliers are sent an initial invitation, then change requests on 3-digit verifications | The Vendor collaboration portal has been designed to grant vendor collaboration permission to existing vendors, or onboard new vendors via a registration wizard. Important: To our knowledge, up to v10.0.0.10, existing suppliers can't be invited to register their details in the registration wizard, this flow is creation only. Instead, the existing vendor(s), once granted access, can change their details in the native Vendor Collaboration workspace, without going through the registration wizard. |
| Staging area | Eftsure onboarding fields | Prospective Vendor requests |
| Custom onboarding fields | Use of Eftsure portal to design forms and add new questions for supplier to answer. New fields in onboarding fields need to be mapped manually and may require additional development. | Use of vendor registration wizard to customise wizard, add new questions fields using configuration and or additional development. |
| Attachments, certificates of currency | Through the use of Eftsure custom onboarding fields of type File or Upload | Standard registration has been extended to support document upload. |
| Workflow | Simple, automated, not much flexibility without further customisation. | Power of Standard Workflow, ability to achieve extremely complex workflow through configuration. |
| Security | The external user being invited will be considered the administrator for the vendor account by default and granted the following roles: Vendor (external) and Vendor admin (external), and can further manage its account, user's roles. | The external user being invited will also be considered the administrator for the vendor account by default, but permissions are granted and revoked in 2 stages: - After vendor creation / update, the external user will be created, and vendor collaboration will be enabled. First, the user is granted Vendor prospect (external) to complete registration and System external user. After internal vendor review and approval, the user's Vendor prospect (external) permissions are revoked and the user is then being granted Vendor (external) and Vendor admin (external), and can further manage its account, user's roles. |
| Bank account verification | Using BankLink, Crowdsourced database, manual entry in the same unique flow | 3 digits verification sent as a follow-up request after the onboarding flow has completed. Adds an extra step in the process to confirm information as typed by supplier |
| Maintenance | Performed manually using standard tools | Performed manually using standard tools |
| Setup | Simple Vendor Collaboration and AAD B2B configuration required. | Full vendor collaboration setup required (Workflows, email templates...) |
| Other Pros | Identical to non-vendor collaboration flow, just a checkbox away from granting access to ERP. Simple segregation of duties. | Native support for questionnaires, support for many additional standard and extended fields. Simple and complex segregation of duties |
| Other Cons | Limited number of options compared to D365 FO | Duration of workflow executions, more complex, many steps involved, many emails and workflow tasks involved, Eftsure change requests are not available for this onboarding type, only 3 digits verifications are available. |
Recommendation
Vendor collaboration can be quite hard and time consuming on your team members and on your suppliers.
The D365FO workflow requires the user to login, specify their information directly inside a D365FO wizard, and although that prepares them to the actions to perform later in D365FO UI, we believe the first contact for the supplier with your onboarding process is simpler, faster and more elegant using our invitation.
A combination of all flows is also achievable at any stage, using the same configuration, therefore we recommend using the Eftsure invitation workflow for most of your suppliers.
When facing a complex supplier, with many addresses, contacts, permissions, when you want to provide even more flexibility to your supplier, we recommend using the standard D365FO workflow.
When having a complex approval cycle, with multiple stakeholders involved, we recommend using the standard D365FO workflow.